Mobile Satellite Internet for under £200? Yes you can...
In order to have unfettered access to cats and cucumbers videos on YouTube in the most remote places in Europe, we decided we absolutely had to have satellite Internet.
Our chosen system operates at a maximum speed of 10Mbps, on ASTRA 3 satellite at 23.5°E orbital position in Ku-band with horizontal polarisation using DVB-S2. In other words, plenty of bandwidth for cat videos...
A customary note, if you just want to look at the pictures in this blog, here is a running project photo journal with the most recent photos at the top.
Our chosen zone 4 footprint covers most of Europe and some of the Nordics, with the exception of of southern Spain, Sardinia and Sicily, where you need a much larger antenna.

Costs
The total cost of hardware and first month connection came to under £200. If you follow this guide, you could save anywhere from £800 to more than £2,000 over the cost of a commercial system. If you would like a quick review of the market, relevant at the time of writing, read my previous post Electronics and the Other Odd Jobs.
Satellite Terminal
I got the previous generation Asta2Connect (now SES Broadband) second-hand kit, which includes a satellite modem and a 500mW Ku-band iLNB from eBay for a bargain price of £11.90!
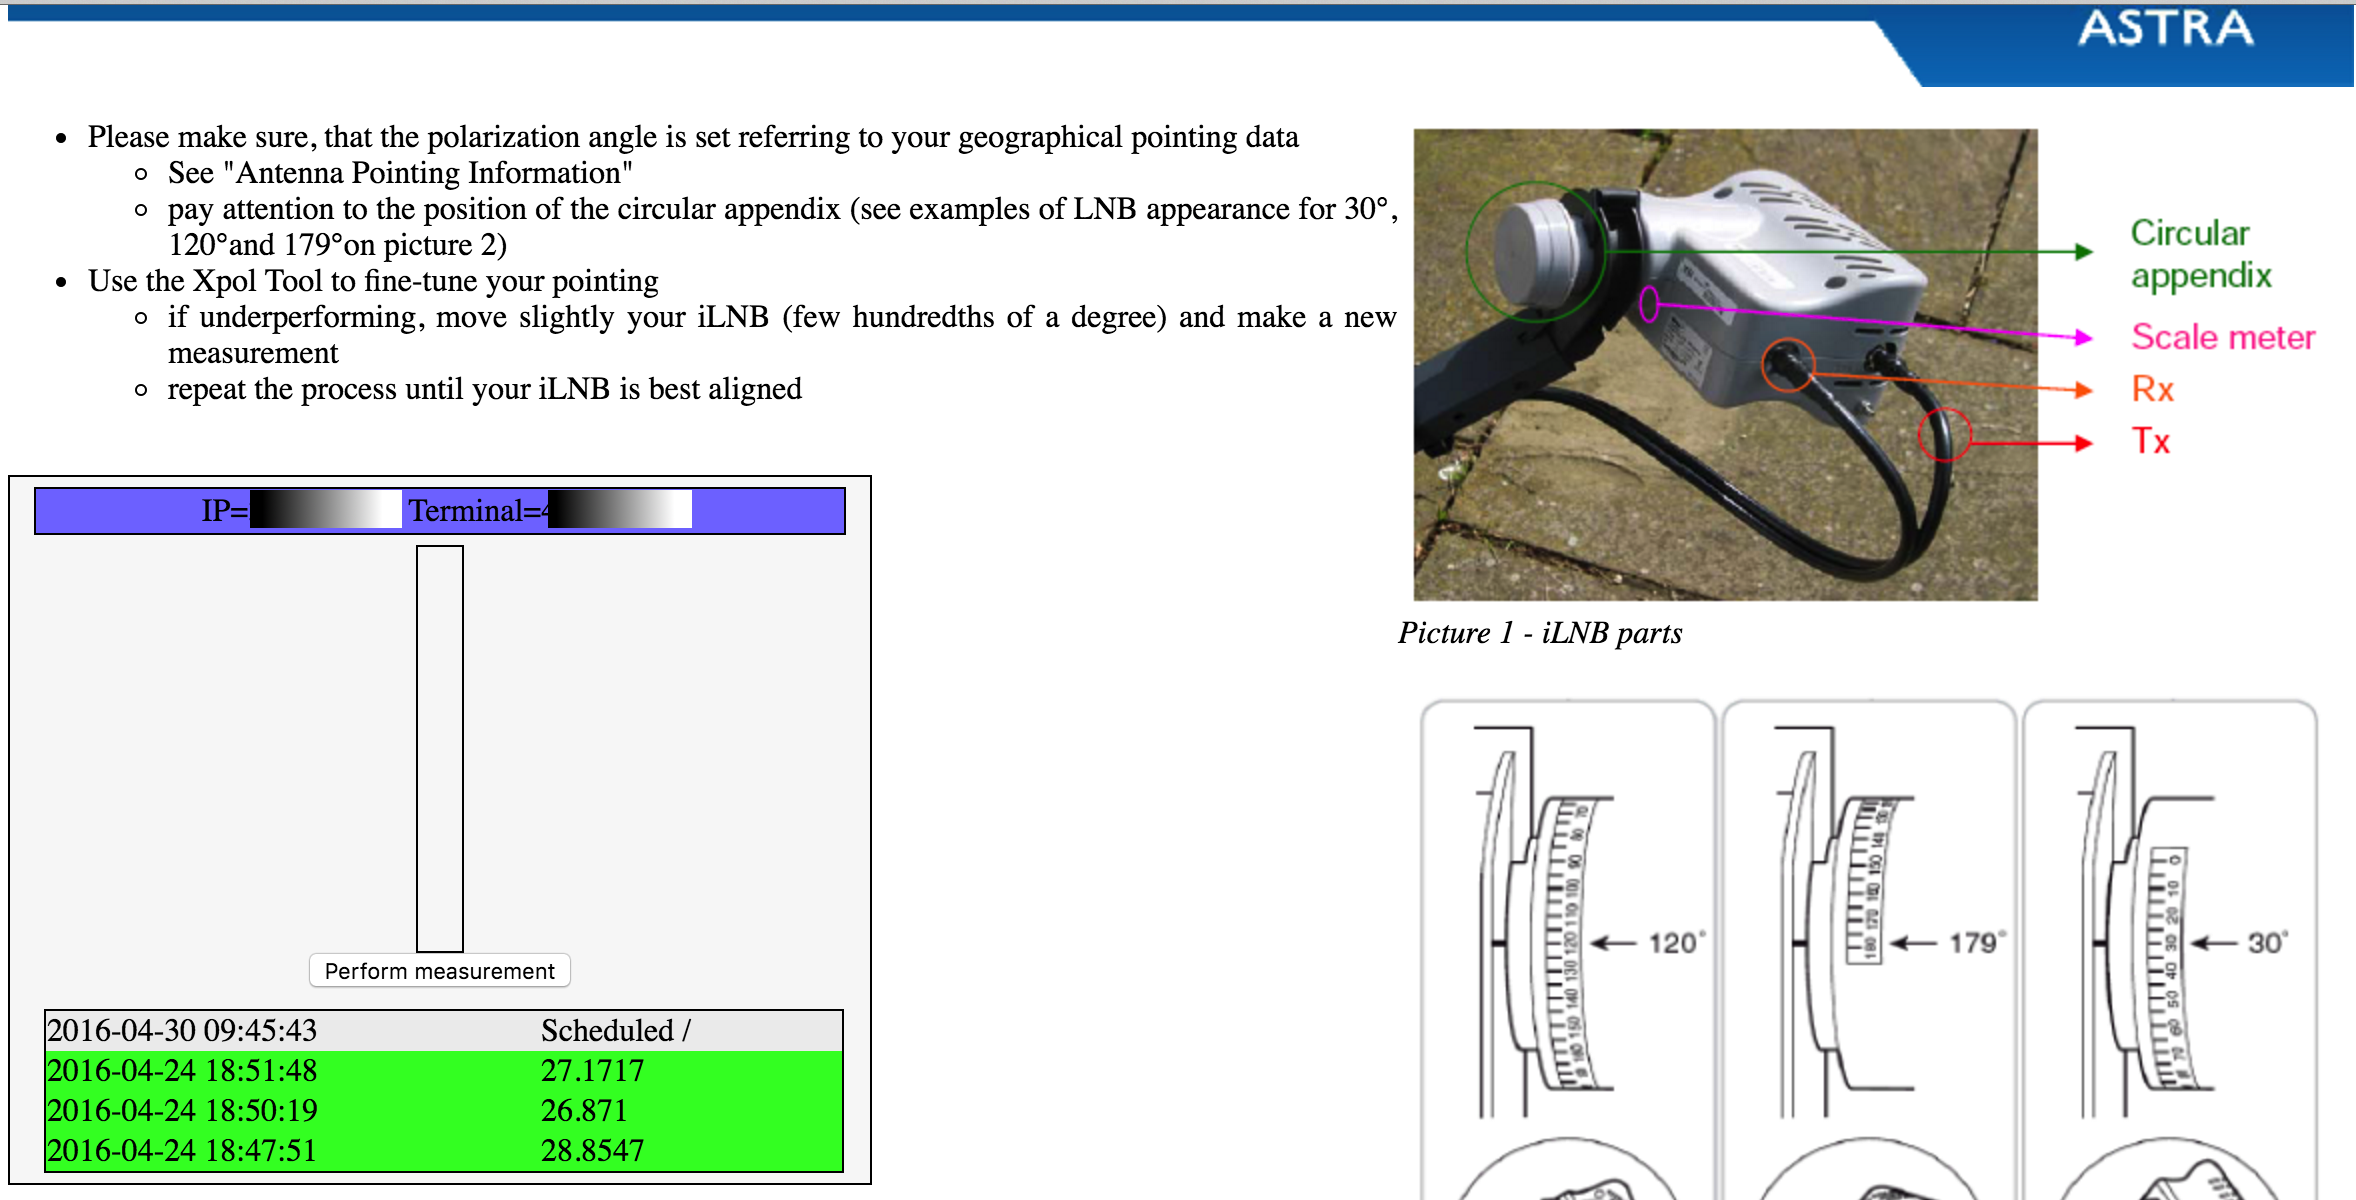
The modem is a Newtec NTC/2252 device, which is marketed under the name of Sat3Play. It comes with a proprietary audio assisted Point&Play tool, which makes alignment very easy. The installation and pointing guide is available here.
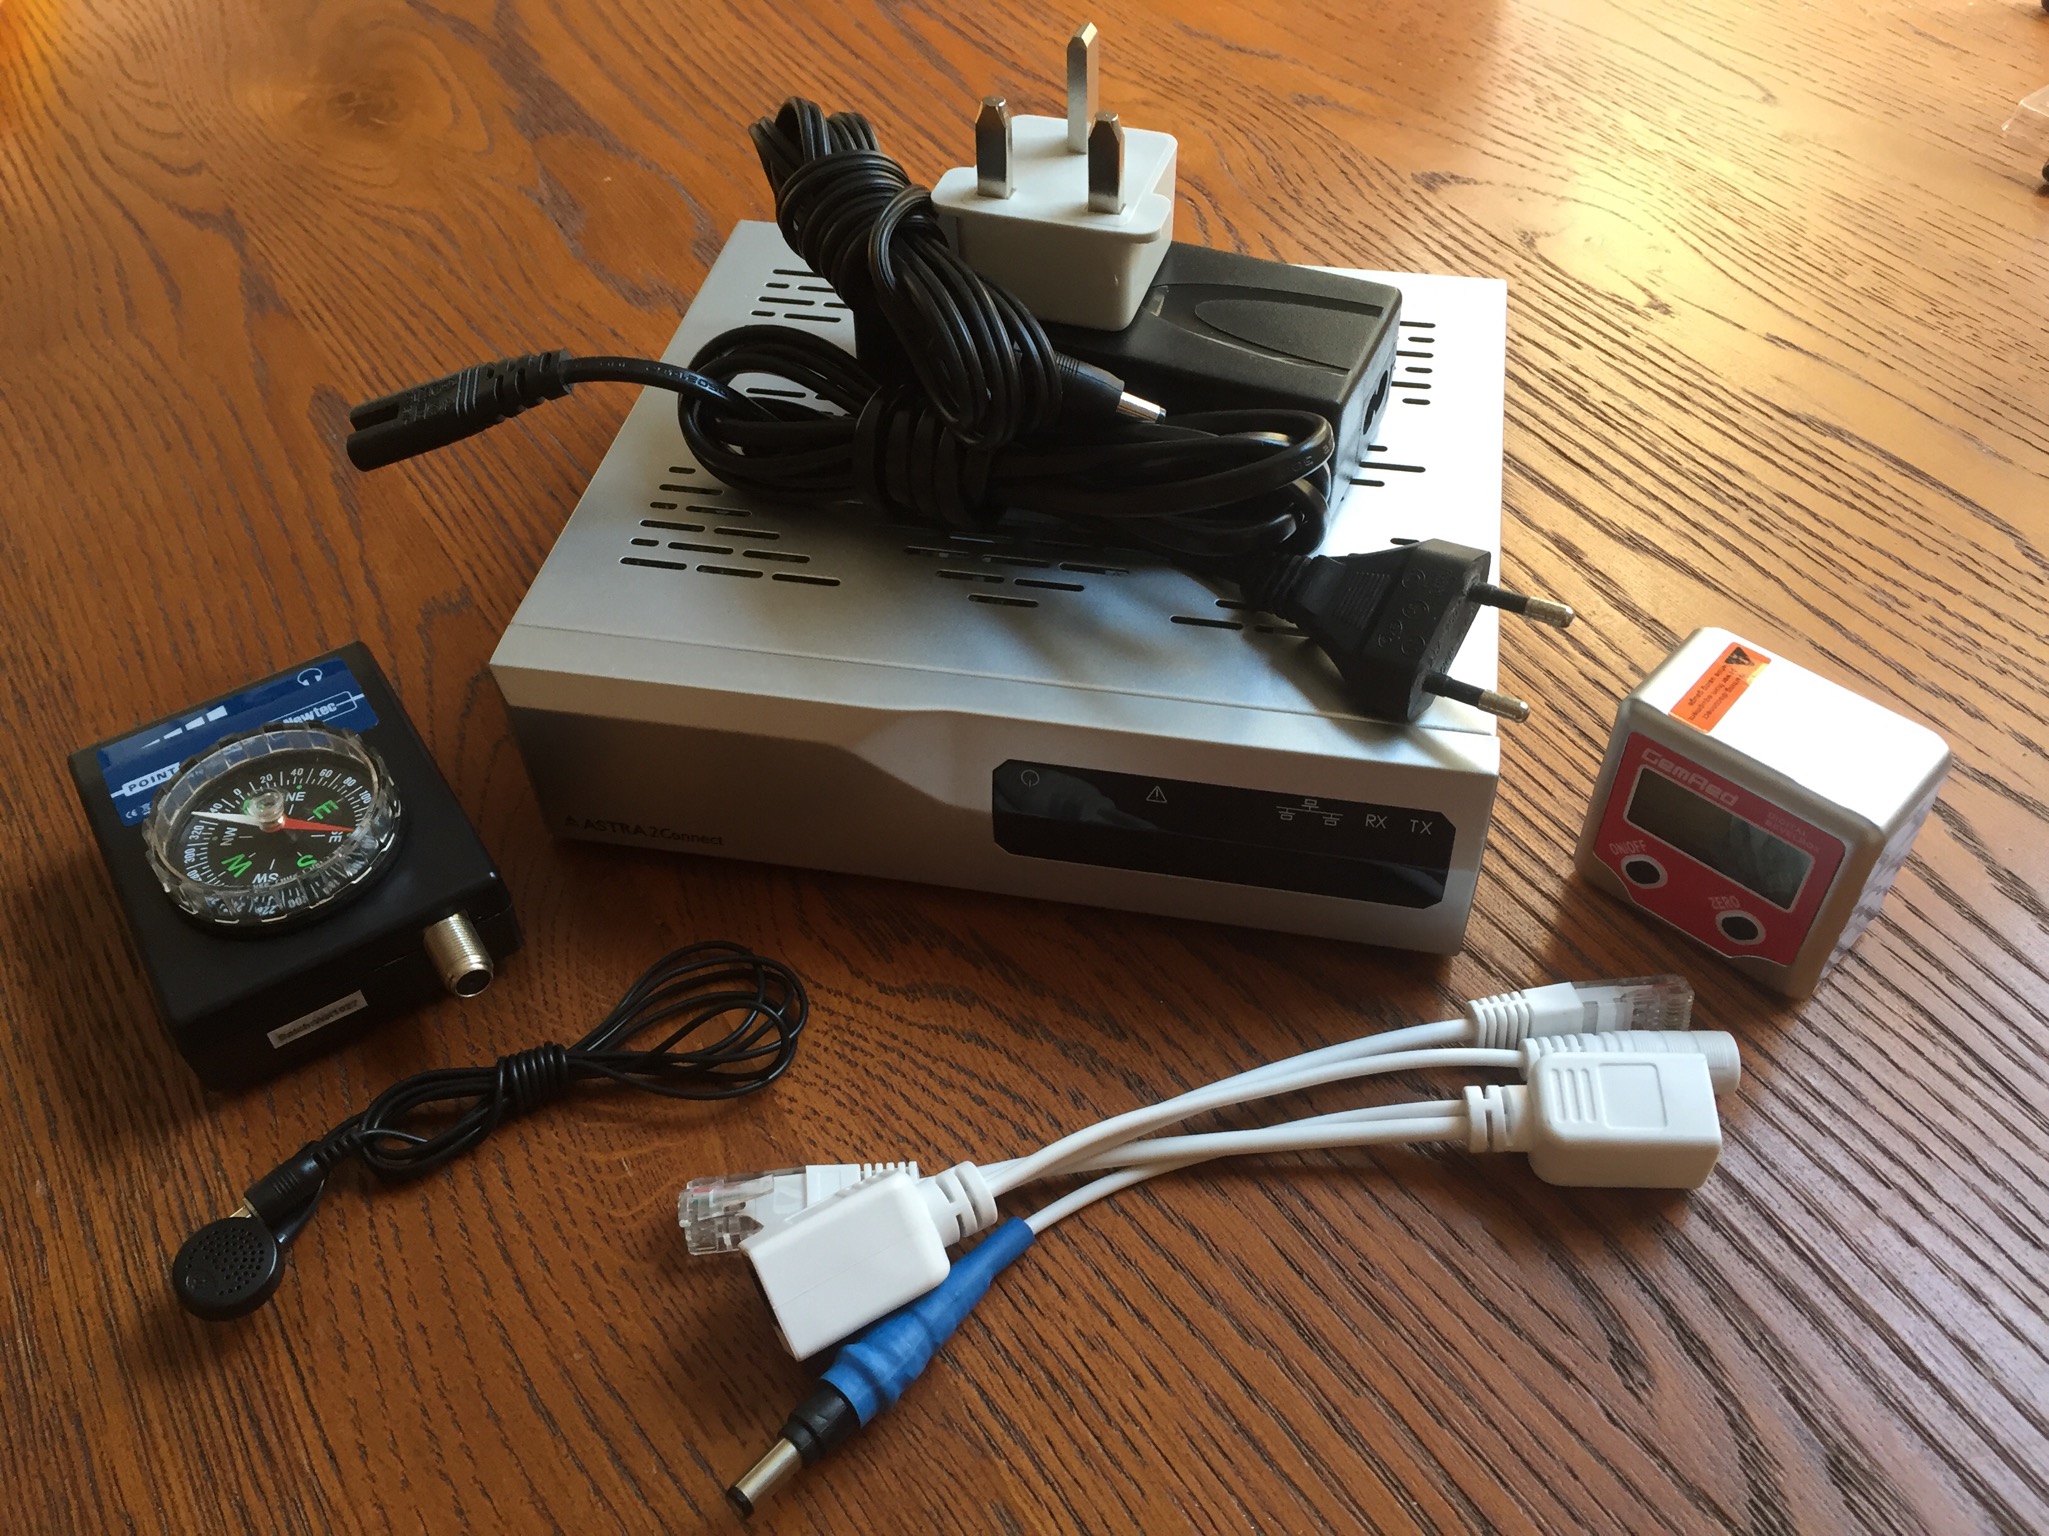
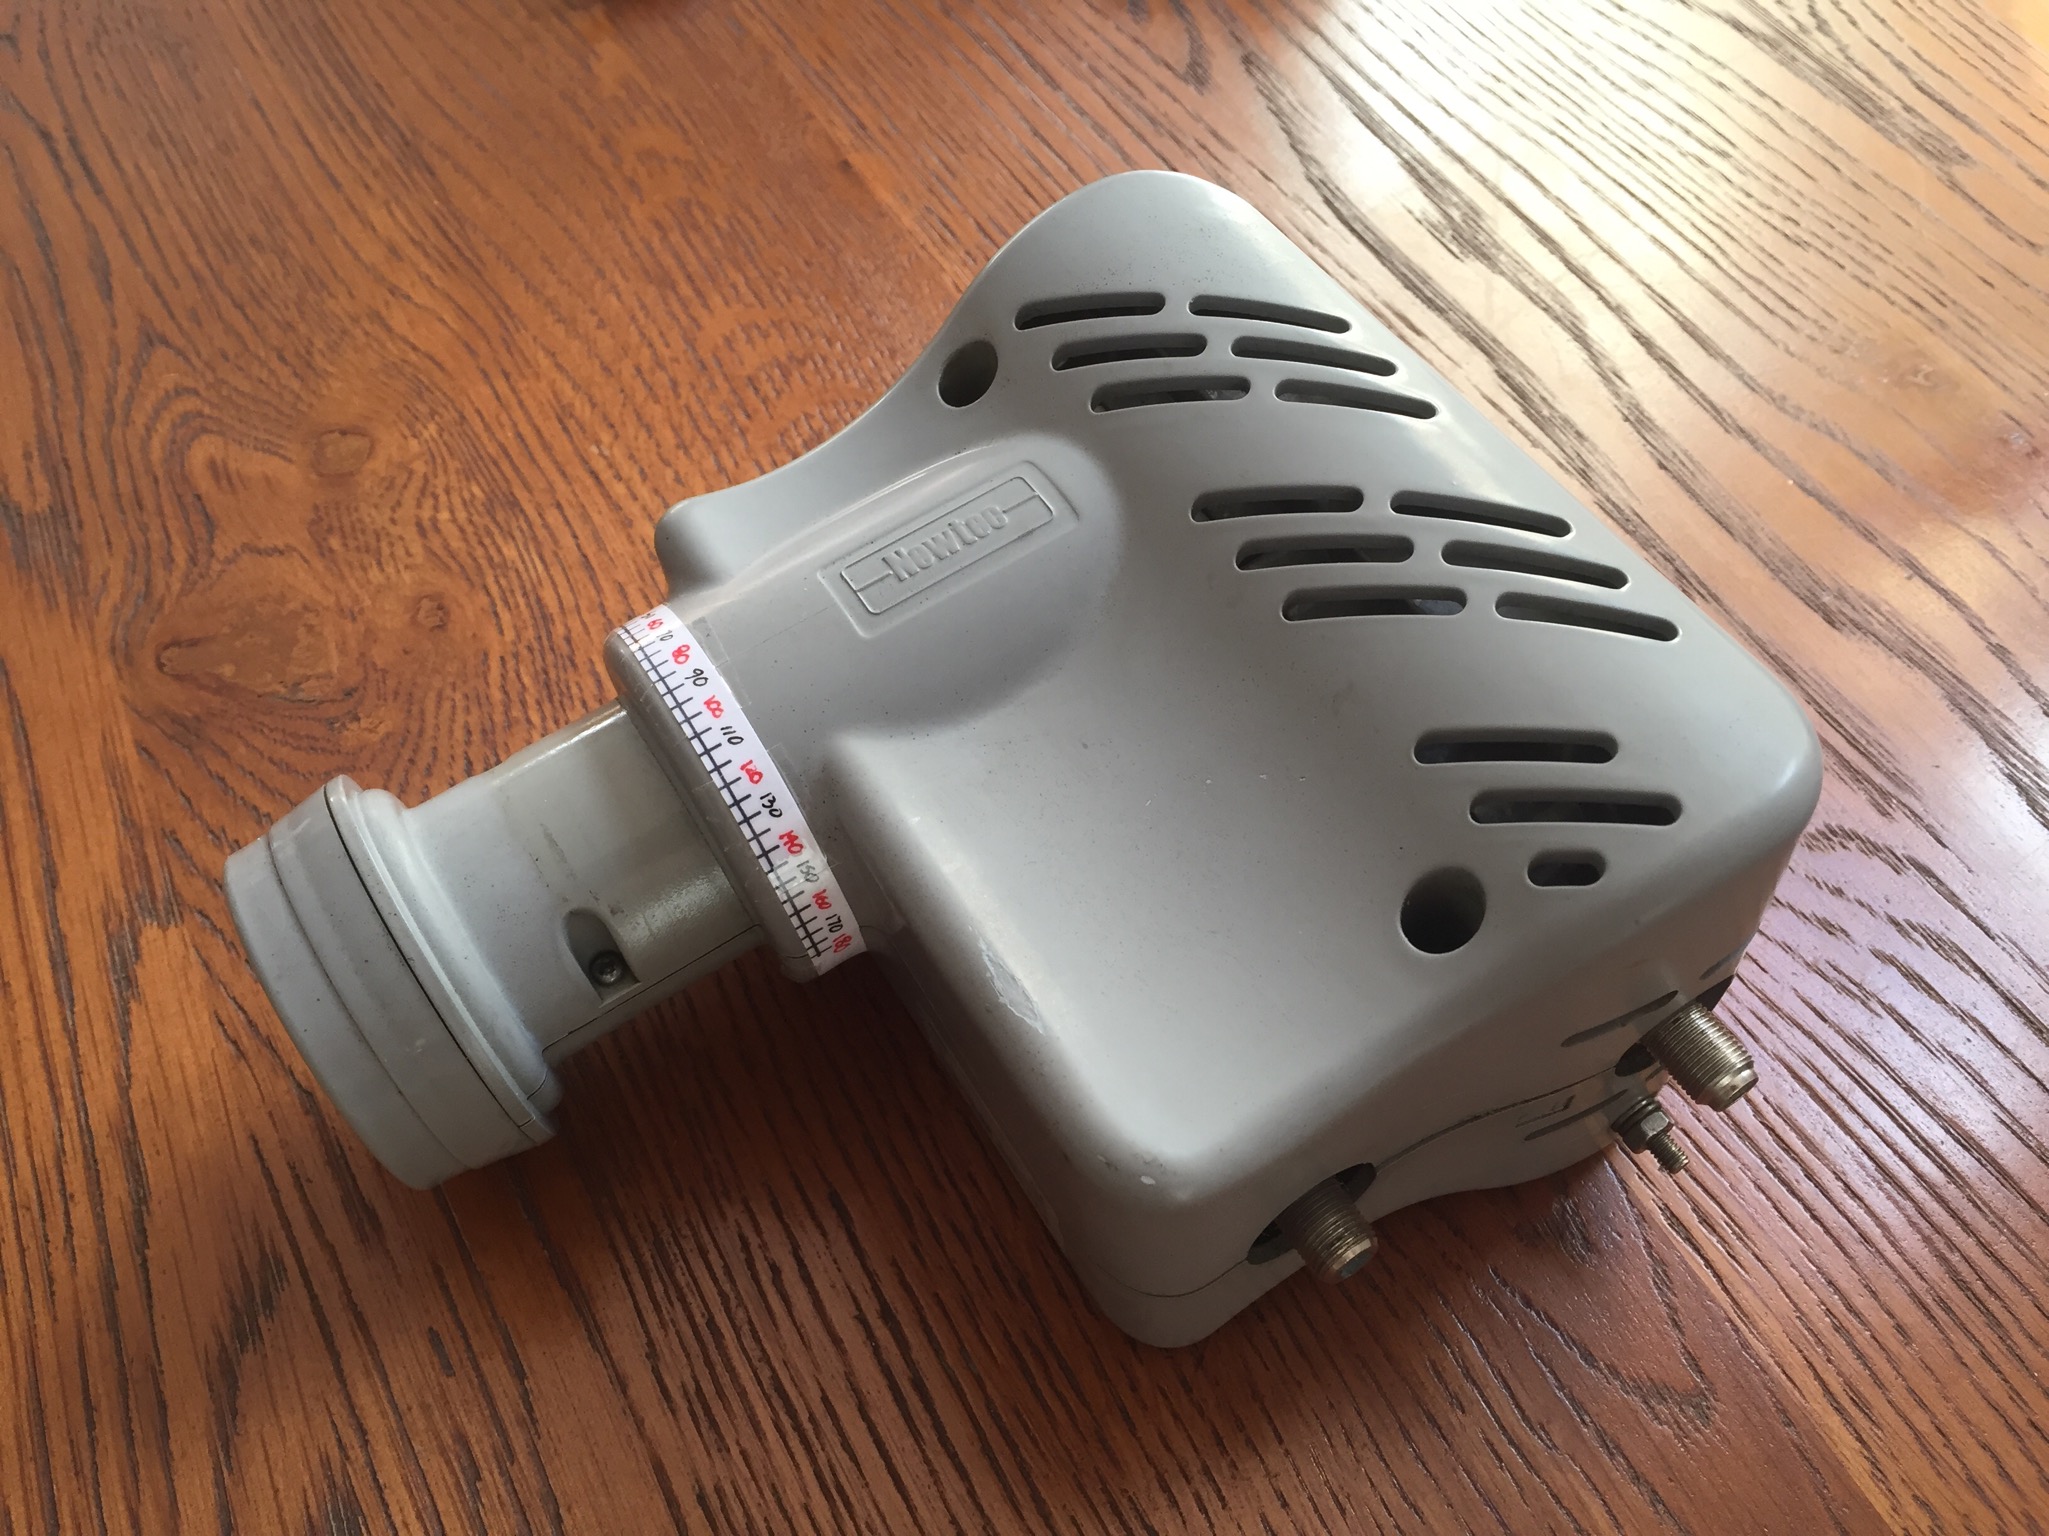
The Interactive LNB is a ILB2110 500 mW Ku-band iLNB.
I suspect Astra is currently upgrading their Deutsch customers to the faster Ka-band and some frugal Germans are selling off their old Ku-band kits. This means you can usually pick up the older kit anywhere from 15 EUR to 150 EUR. Search eBay and also eBay Classifieds for astra2connect and/or sat3play and get your Google Translate out...
In any case, while the new kit costs around £265 + VAT, comes with a new modem supporting faster Ka-band and a 85cm dish, I opted for a second-hand one, because: (a) I wasn't sure if this setup was actually going to work; (b) even if it did work, I wanted a smaller dish regardless; and (c) Ka-band isn't well suited to mobile installations. If you'd like a practical summary of differences between Ka and Ku bands and their suitability to mobile installations, read this.
I had to make a custom polarisation scale gauge, since the factory one must have fallen off somewhere between Germany and the UK. The scale is 2.5mm per 5° increments, so I printed off a suitable grid on an A4 sheet, laminated it, cut it out, trimmed it, labelled from 0 to 180 in 5° increments and attached it to the iLNB neck with clear tape. This is good enough to get the rough polarisation angle, with fine-tuning performed later by the online Xpol tool.
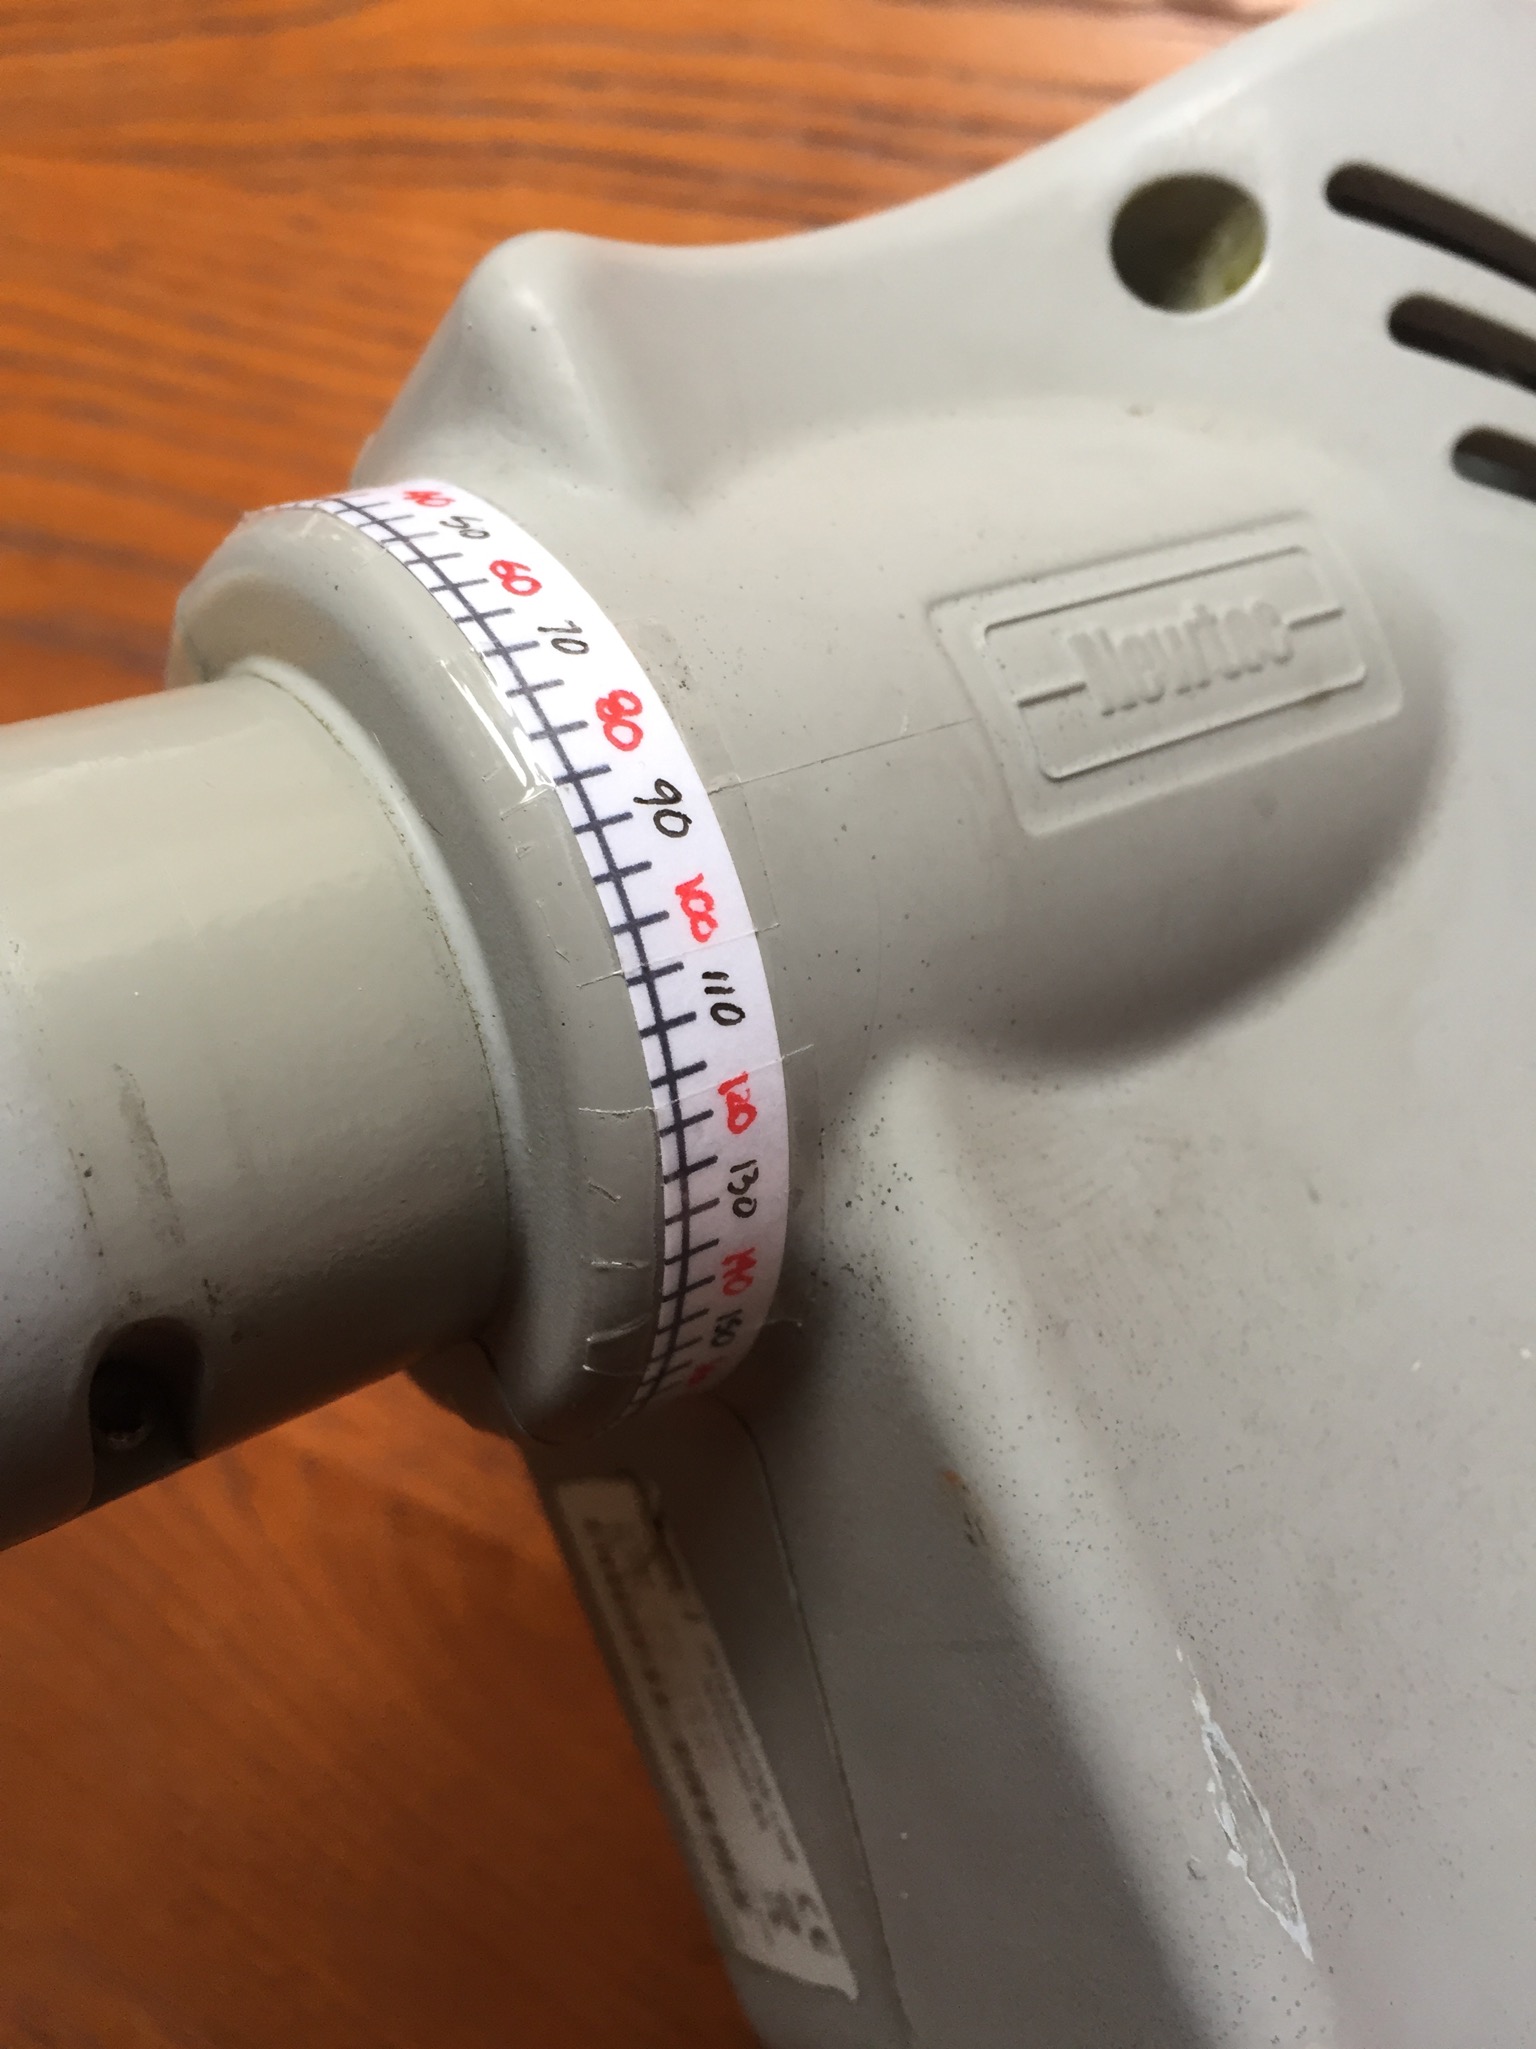
In case a reprint is required, here is my original polarisation grid template.
Since the modem lives on the roof (in the roof box or perhaps in the spare tyre bowl), it is powered over CAT5 cable by a passive PoE injector from inside the van (eBay). The modem needs a 15VDC@2A feed, which I provide using XL6009 adjustable step-up converter module from the native 12VDC (eBay).
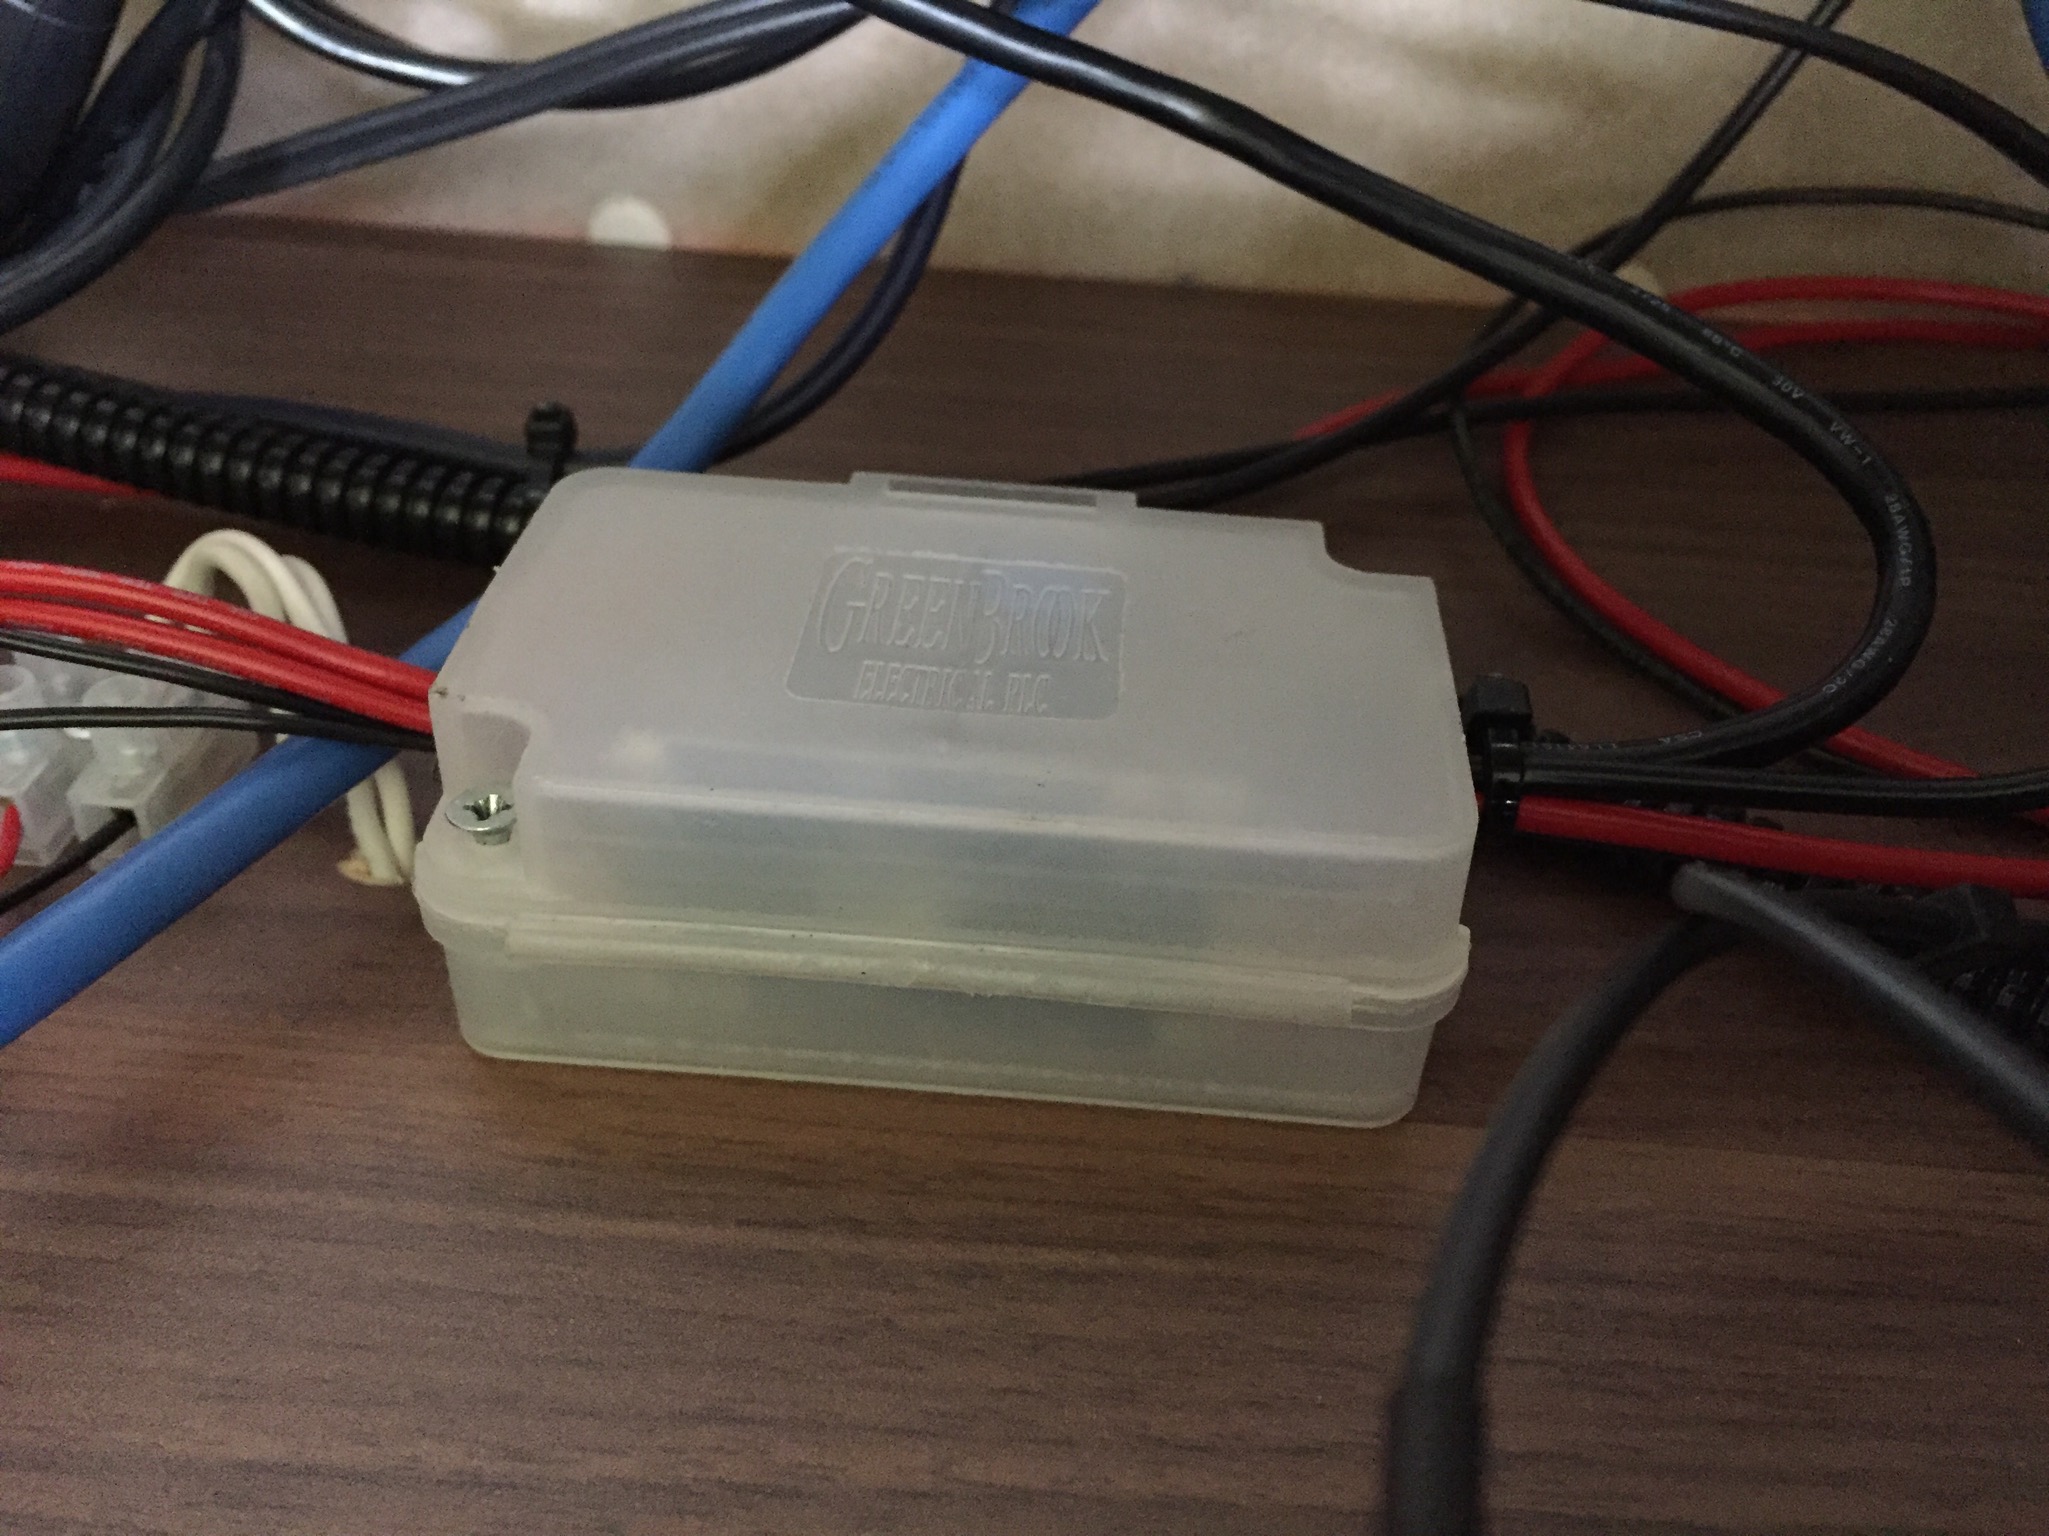
Also, since the modem has a 2.5mm DC socket, I had to replace the 2.1mm DC plug on the extractor side with a larger 2.5mm one. In what can only be described as a rare occurrence of 20/20 foresight, I provisioned a waterproof CAT5 socket on the roof as part of the build earlier.
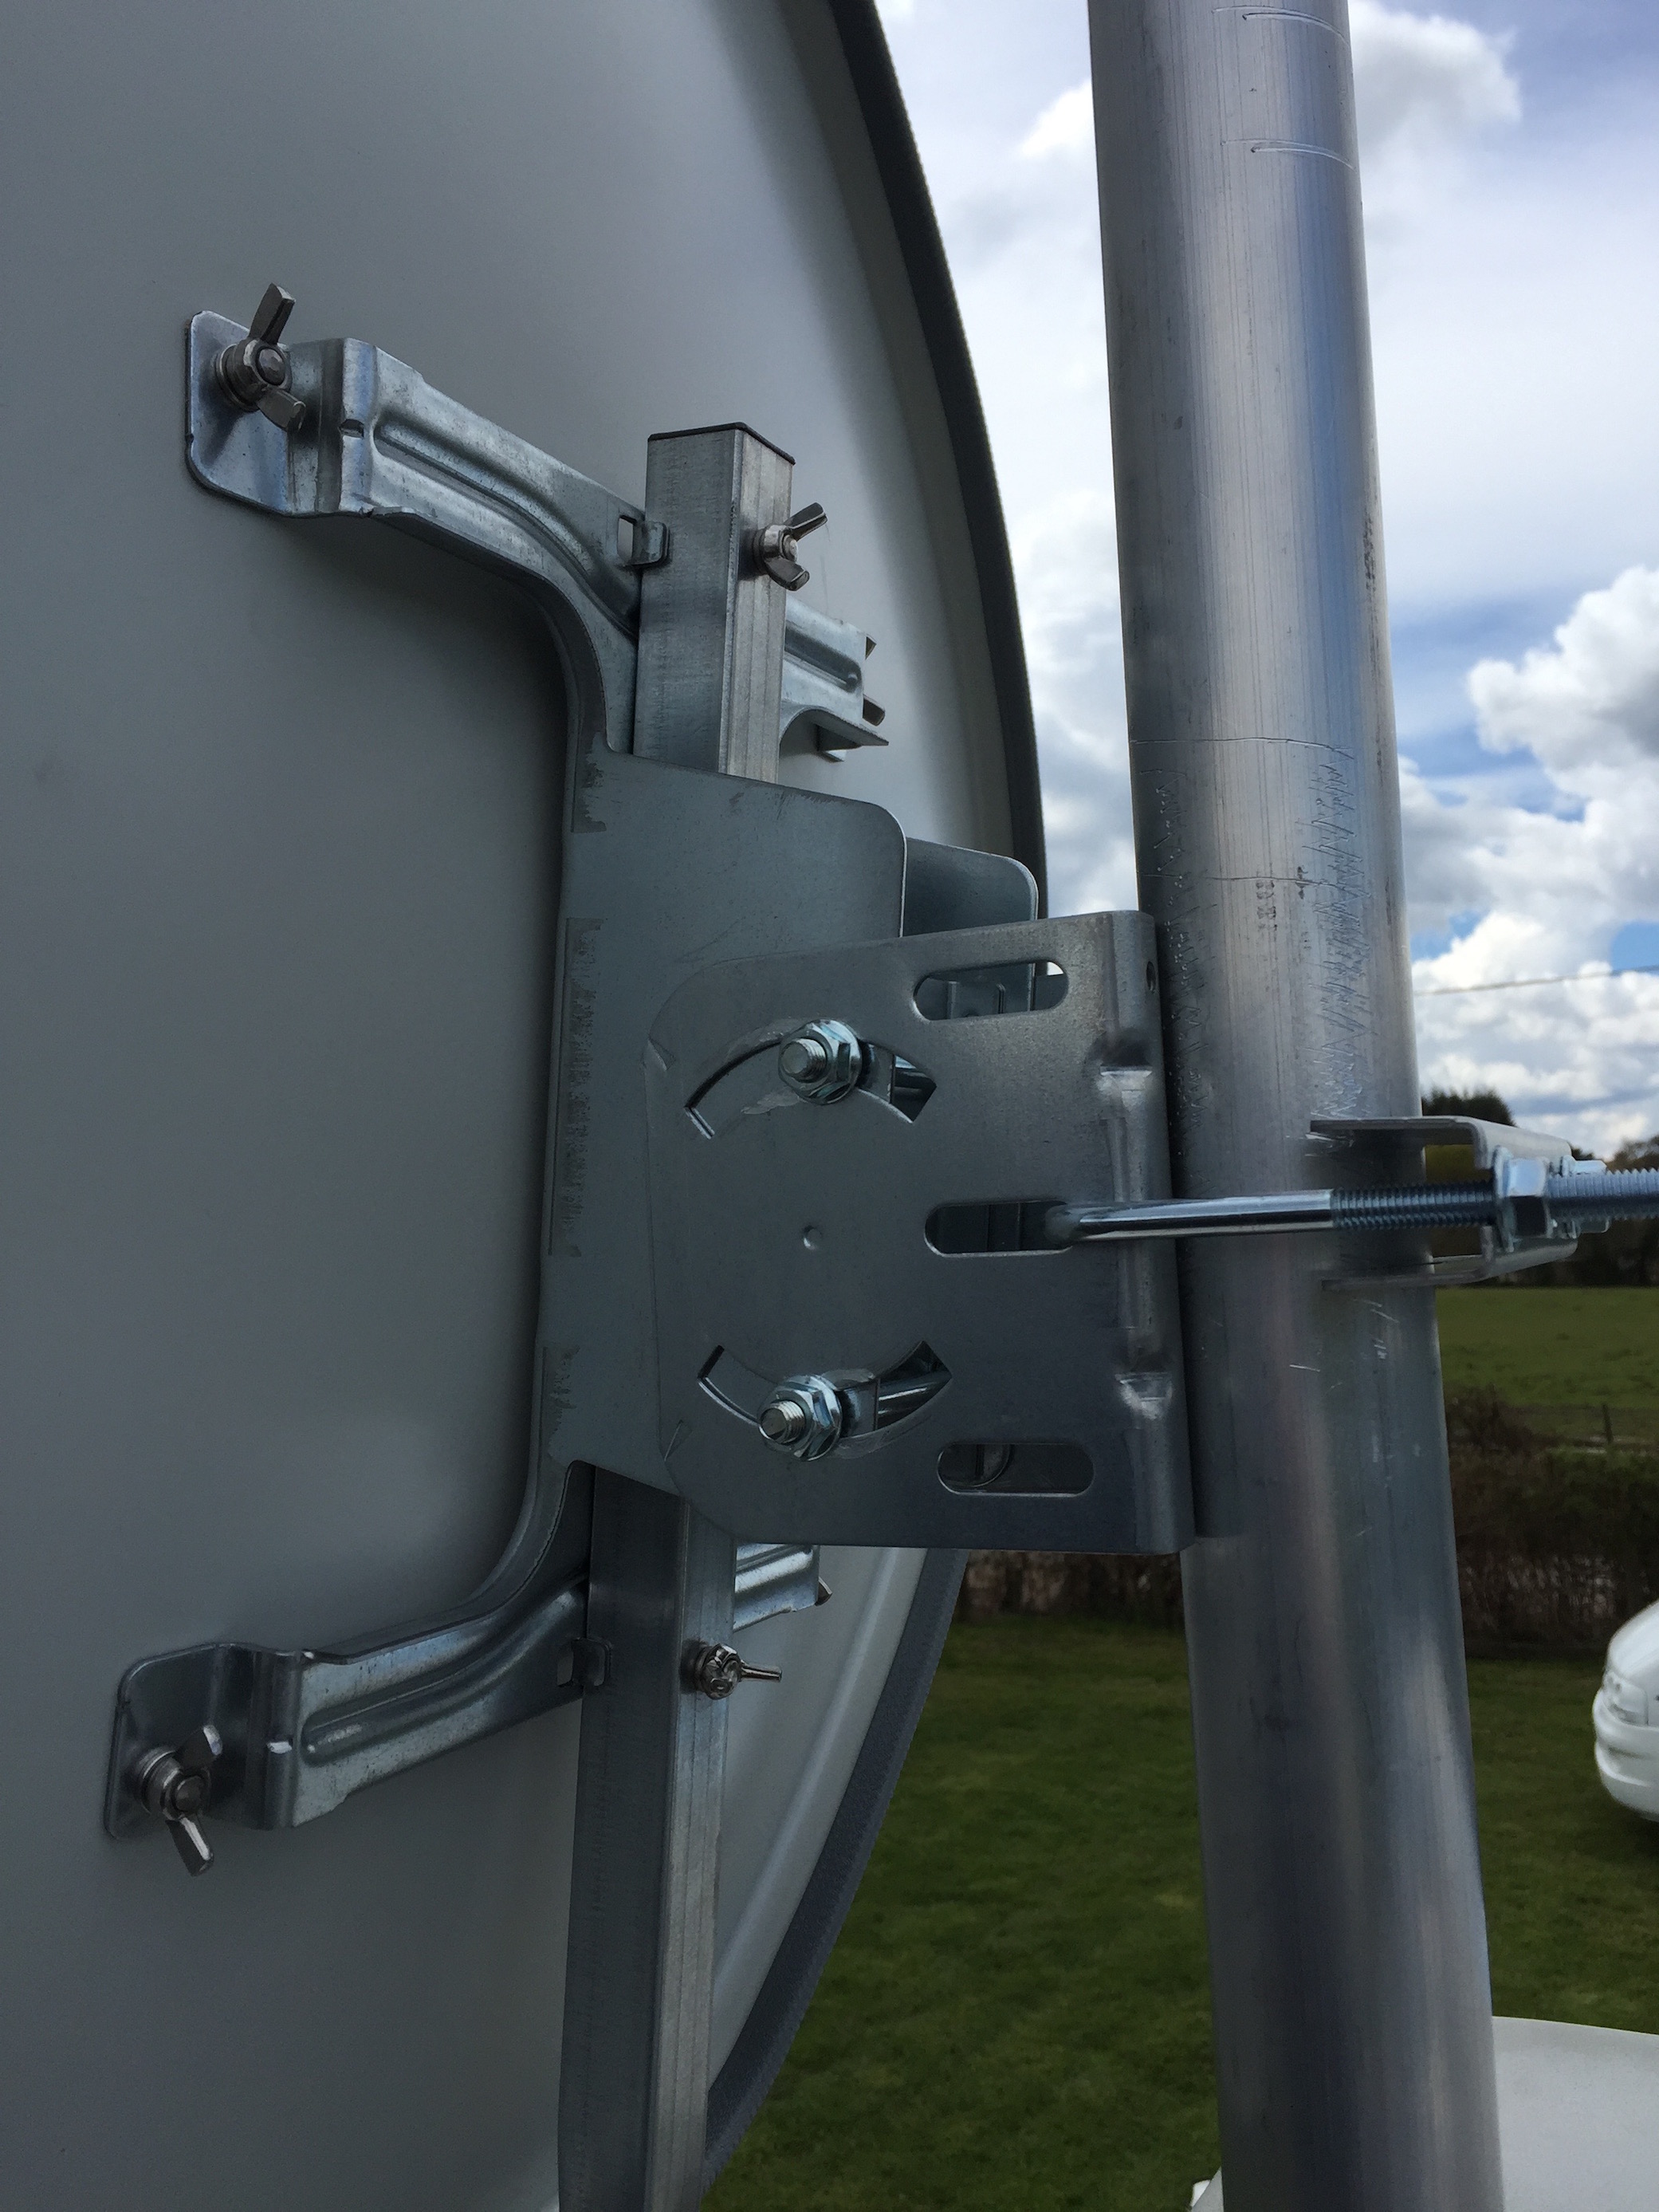
Lastly, I ordered an inclinometer from eBay, one meter of two inch aluminium 10swg pipe, with 2" x 2" Shelley Mast Clamp and some plastic pipe end-caps.
On top of that, I had some existing F-type RF connectors, a crimping tool and a length of coax, which I re-purposed to connect the modem and the iLNB, plus plenty of CAT5 cable.
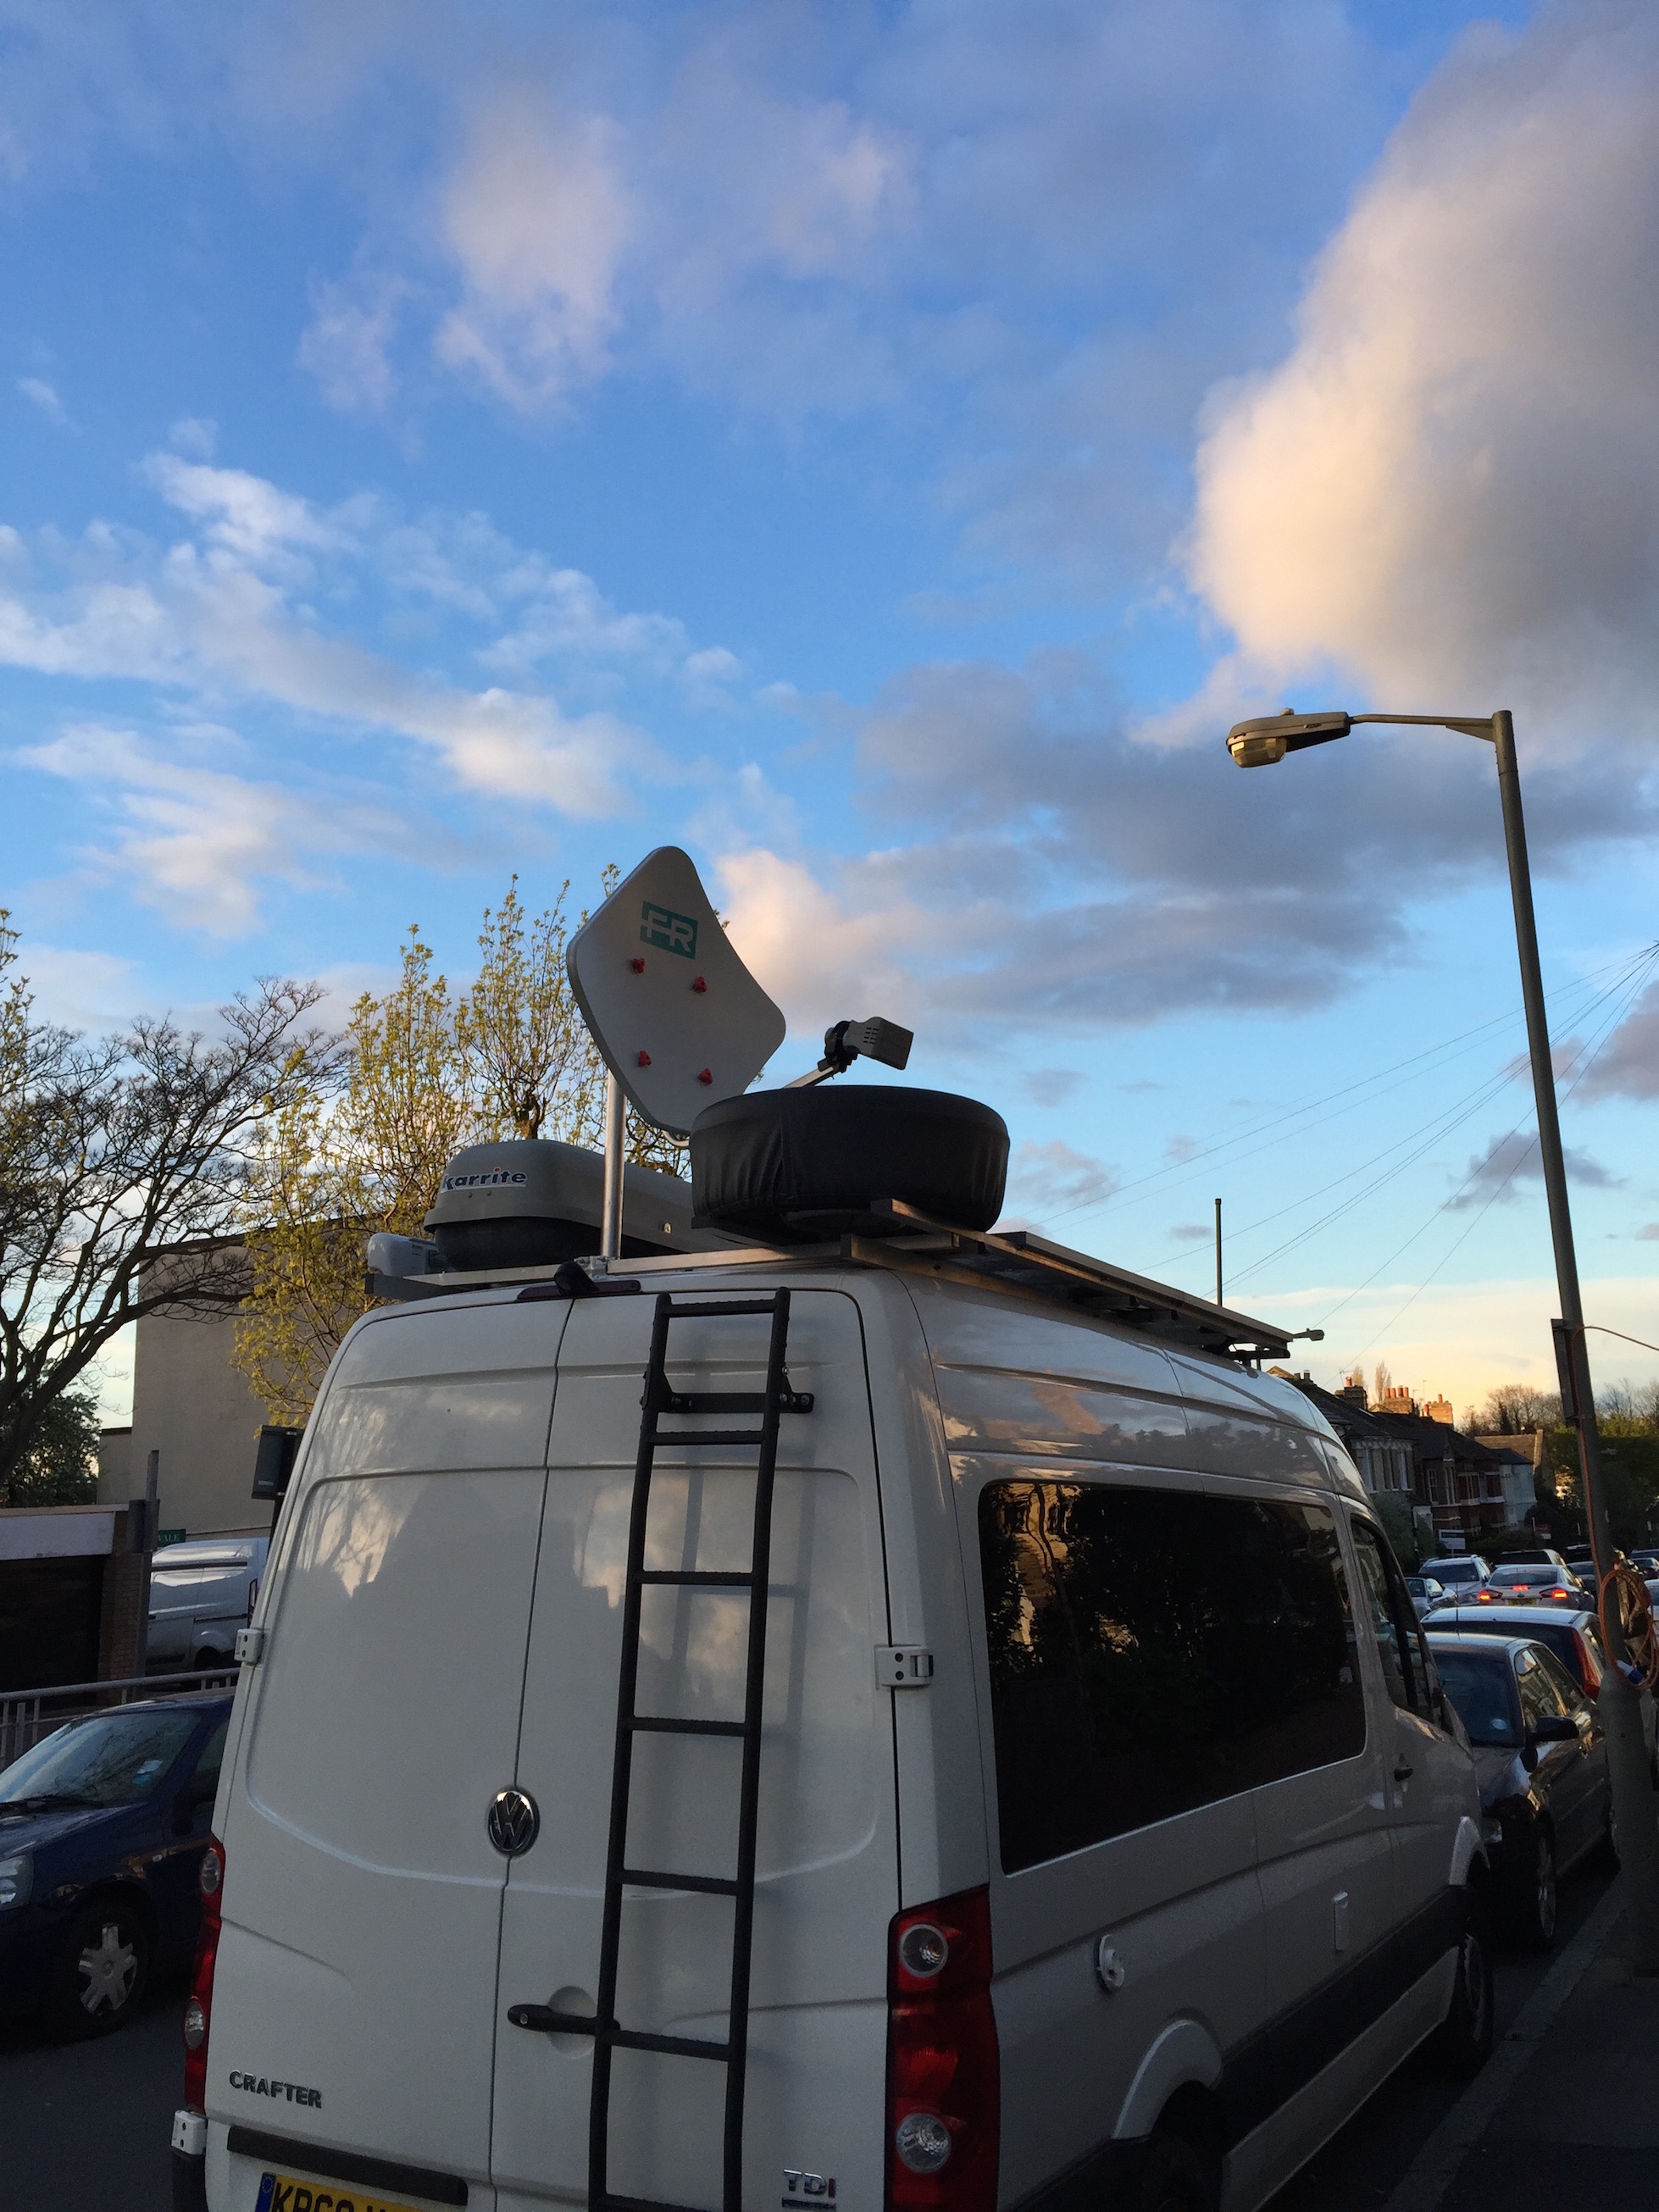
Antenna Dish
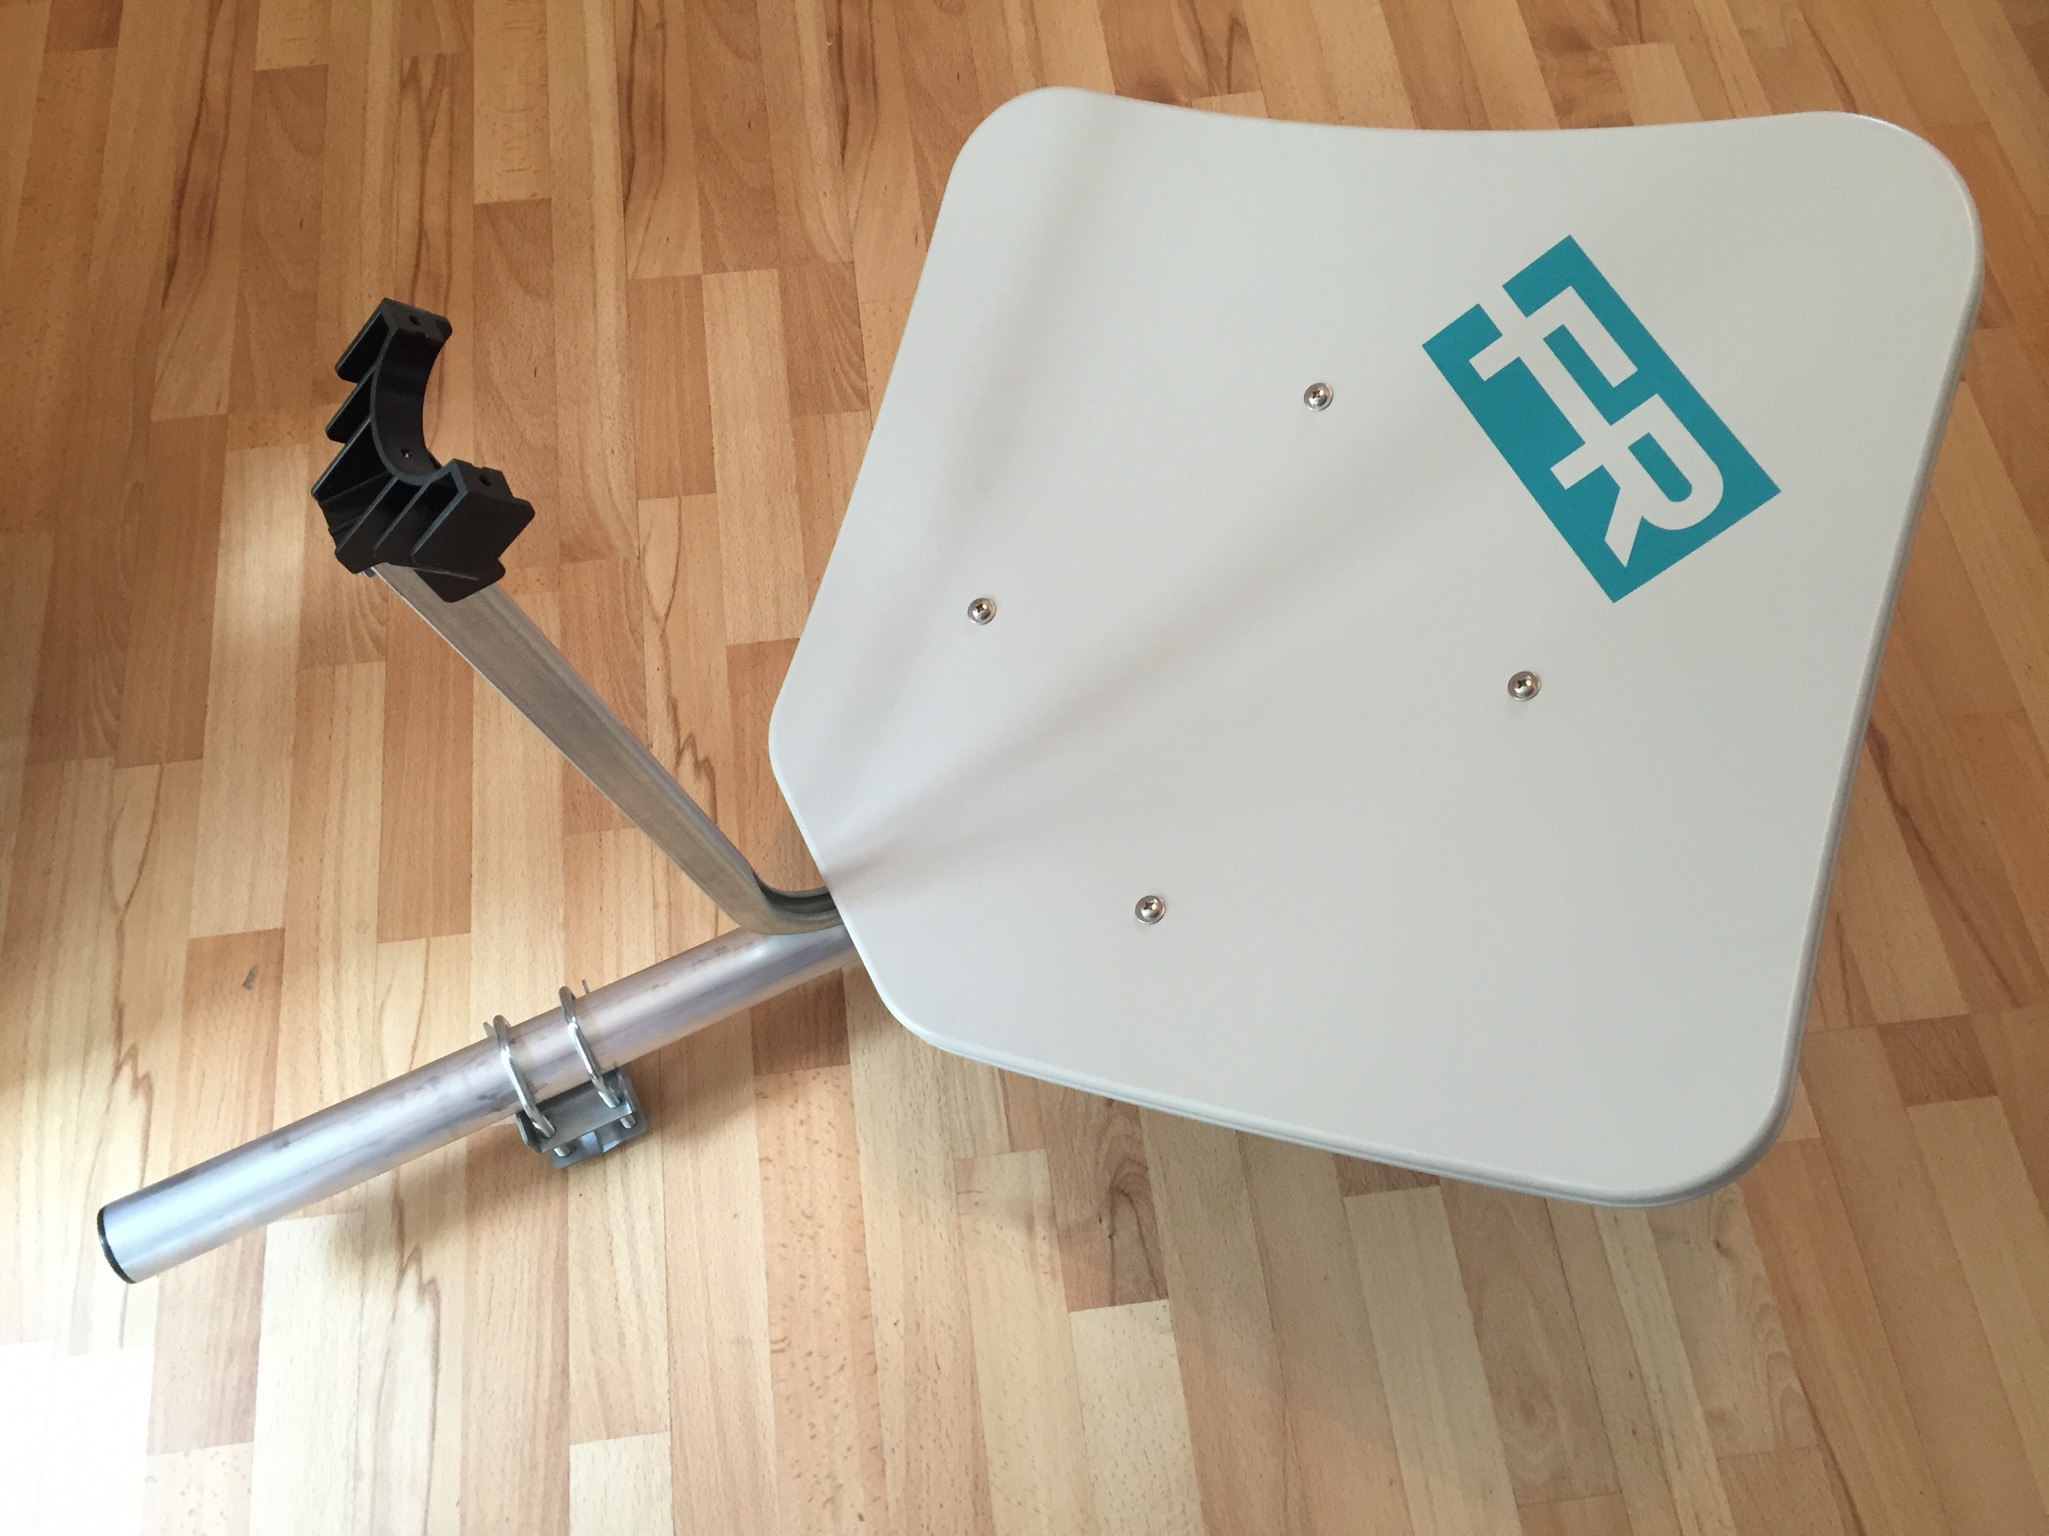
Astra kits are normally supplied with a 85cm round dish. Since I got the kit second-hand sans dish, I opted for a smaller 68cm dish made by Fracarro, called PENTA DIGIT 68cm. These dishes are available from eBay in three different colours as well as other satellite equipment resellers and come with a galvanised steel mounting bracket. They should also be easier to store away when on the move.
ISP
For the ISP, I chose the aptly named Satellite Internet (formerly BeyondDSL). For the initial testing phase, I chose the 23.5 Ku 4M3 ValuePlus / Monthly package at £15.95 per month, plus a £40 one-off connection fee. This package gives maximum 4Mbps throughput with 3GB monthly quota. You can also get off-peak unlimited data for additional £7 per month.
As well as the satellite receiver, Satellite Internet can supply a dual-LNB clamp for £59 to get TV reception and Internet on the same dish, but since we don't watch broadcast TV, we decided not to bother with it.
If you are bringing your own kit, like I did, connection is very simple. It involves giving the ISP the AIR MAC address printed on your modem and pulling out your wallet.
Assembly and Pointing
For the test, I bolted the mast to our ladder, which I temporarily set-up in the back yard. Using the values from the Astra pointing web site and a compass, I set the azimuth to around 150° and elevation to around 27°. I also set the iLNB polarisation offset to around 10°. After an hour or so of re-crimping the cables and trying to get a signal, I realised my elevation was off because the mast wasn't exactly straight. Using materials available on hand, the elevation was corrected.
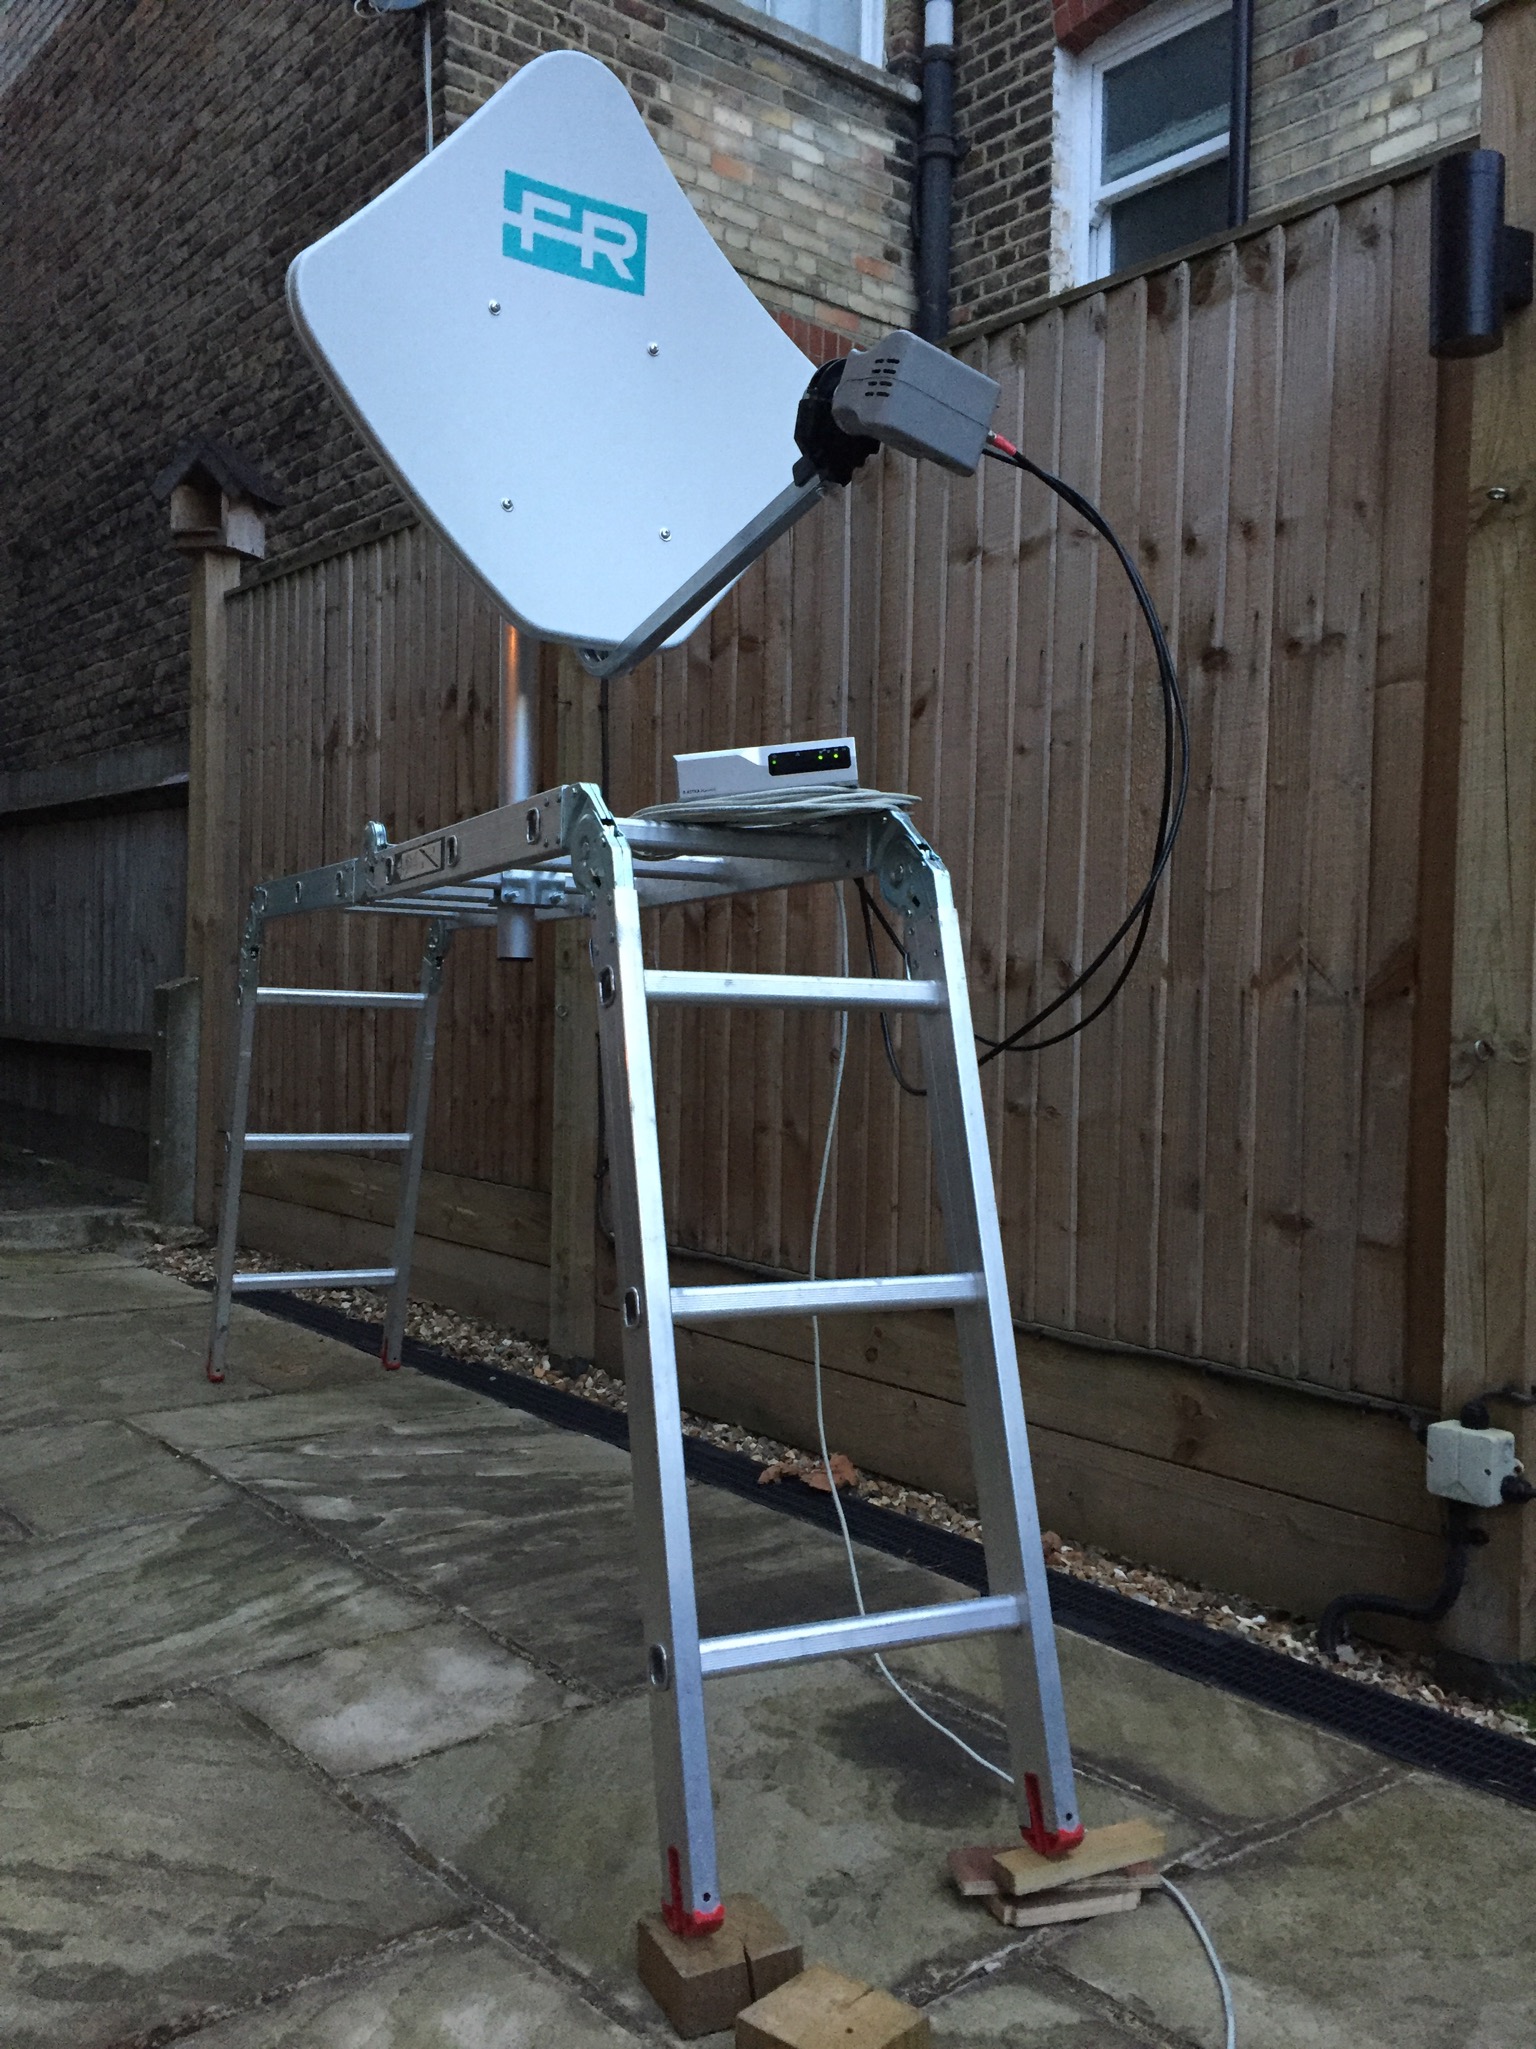
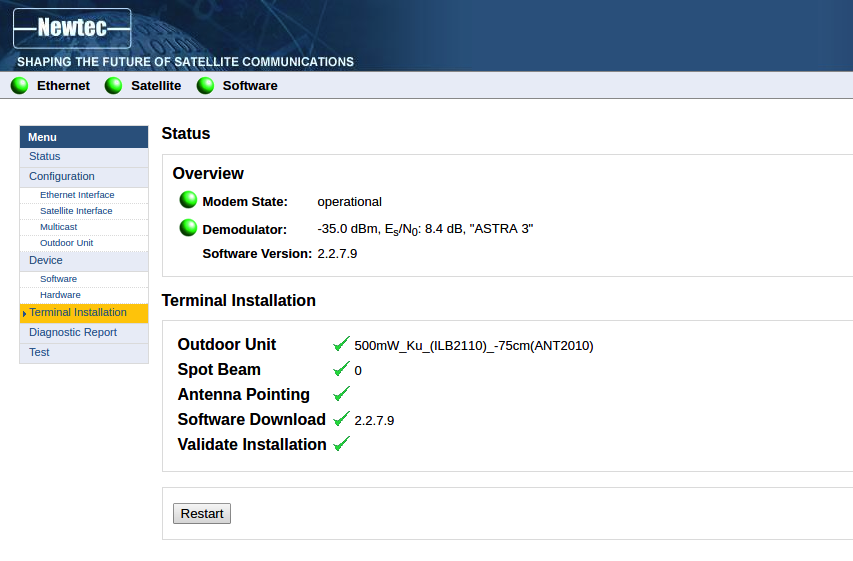
Following the official Newtec video instruction for my iLNB/modem, I managed to get on with the pointing. After quickly finding the strongest signal and completing the manual pointing operation, the modem synchronised, registered with the hub and went to download the software upgrade to v2.x.
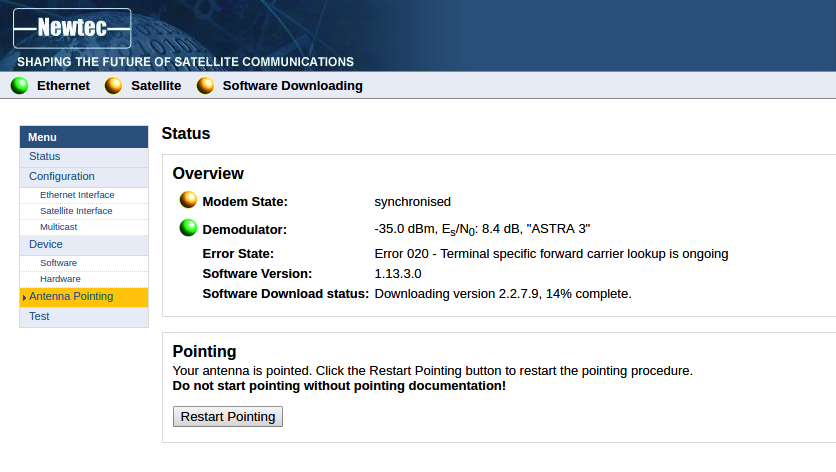
After the software upgrade was eventually downloaded and installed, the modem rebooted and came up on-line.
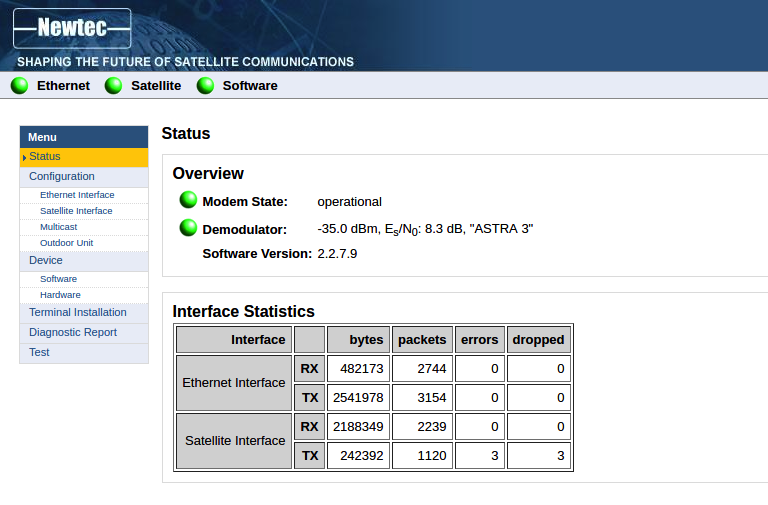
Poking around the various screens in the web interfaces revealed that the terminal installation had been successfully completed.
I did some quick testing and found the web browsing performance more than adequate, although with a 500ms average ping times, I wouldn't plan on playing any on-line games.
$ ping 8.8.8.8 -c 10
PING 8.8.8.8 (8.8.8.8) 56(84) bytes of data.
64 bytes from 8.8.8.8: icmp_seq=1 ttl=51 time=1036 ms
64 bytes from 8.8.8.8: icmp_seq=2 ttl=51 time=2137 ms
64 bytes from 8.8.8.8: icmp_seq=3 ttl=51 time=1155 ms
64 bytes from 8.8.8.8: icmp_seq=4 ttl=51 time=617 ms
64 bytes from 8.8.8.8: icmp_seq=5 ttl=51 time=647 ms
64 bytes from 8.8.8.8: icmp_seq=6 ttl=51 time=588 ms
64 bytes from 8.8.8.8: icmp_seq=7 ttl=51 time=1307 ms
64 bytes from 8.8.8.8: icmp_seq=8 ttl=51 time=1249 ms
64 bytes from 8.8.8.8: icmp_seq=9 ttl=51 time=1409 ms
64 bytes from 8.8.8.8: icmp_seq=10 ttl=51 time=1280 ms

--- 8.8.8.8 ping statistics ---
10 packets transmitted, 10 received, 0% packet loss, time 9017ms
rtt min/avg/max/mdev = 588.102/1142.966/2137.696/442.586 ms, pipe 3
The other good point about the Astra connection, is that you effectively get a static UK based IP address assigned, so you could watch BBC iPlayer without proxying. The connection is also not filtered/NATed, so you could run services on your end, which would be publicly accessible over the Internet.
A note on alignment. The dish is roughly pointed in the right direction and set at the right elevation. Then adjusted using the
Point&Playtool, listening to the audible indicator until it makes a continuous high-pitched beep.
From my back-yard testing, it appears that the elevation angle of the arm is exactly 11° below the actual dish elevation angle, so when the dish elevation reads 27°, the inclinometer on the arm should read 16°. This is good, because I can use the inclinometer plus some simple maths to get a precise elevation, rather than using the difficult to read metal gauge etched in the mounting bracket.
iLNB Polarisation
The iLNB needs to be set at the correct polarisation angle for a given location to give optimal performance. After roughly setting this angle using the scale gauge printed on the iLNB, it can be fine-tuned using the Xpol Tool. I followed the instructions on the site to get the optimal iLNB pointing.
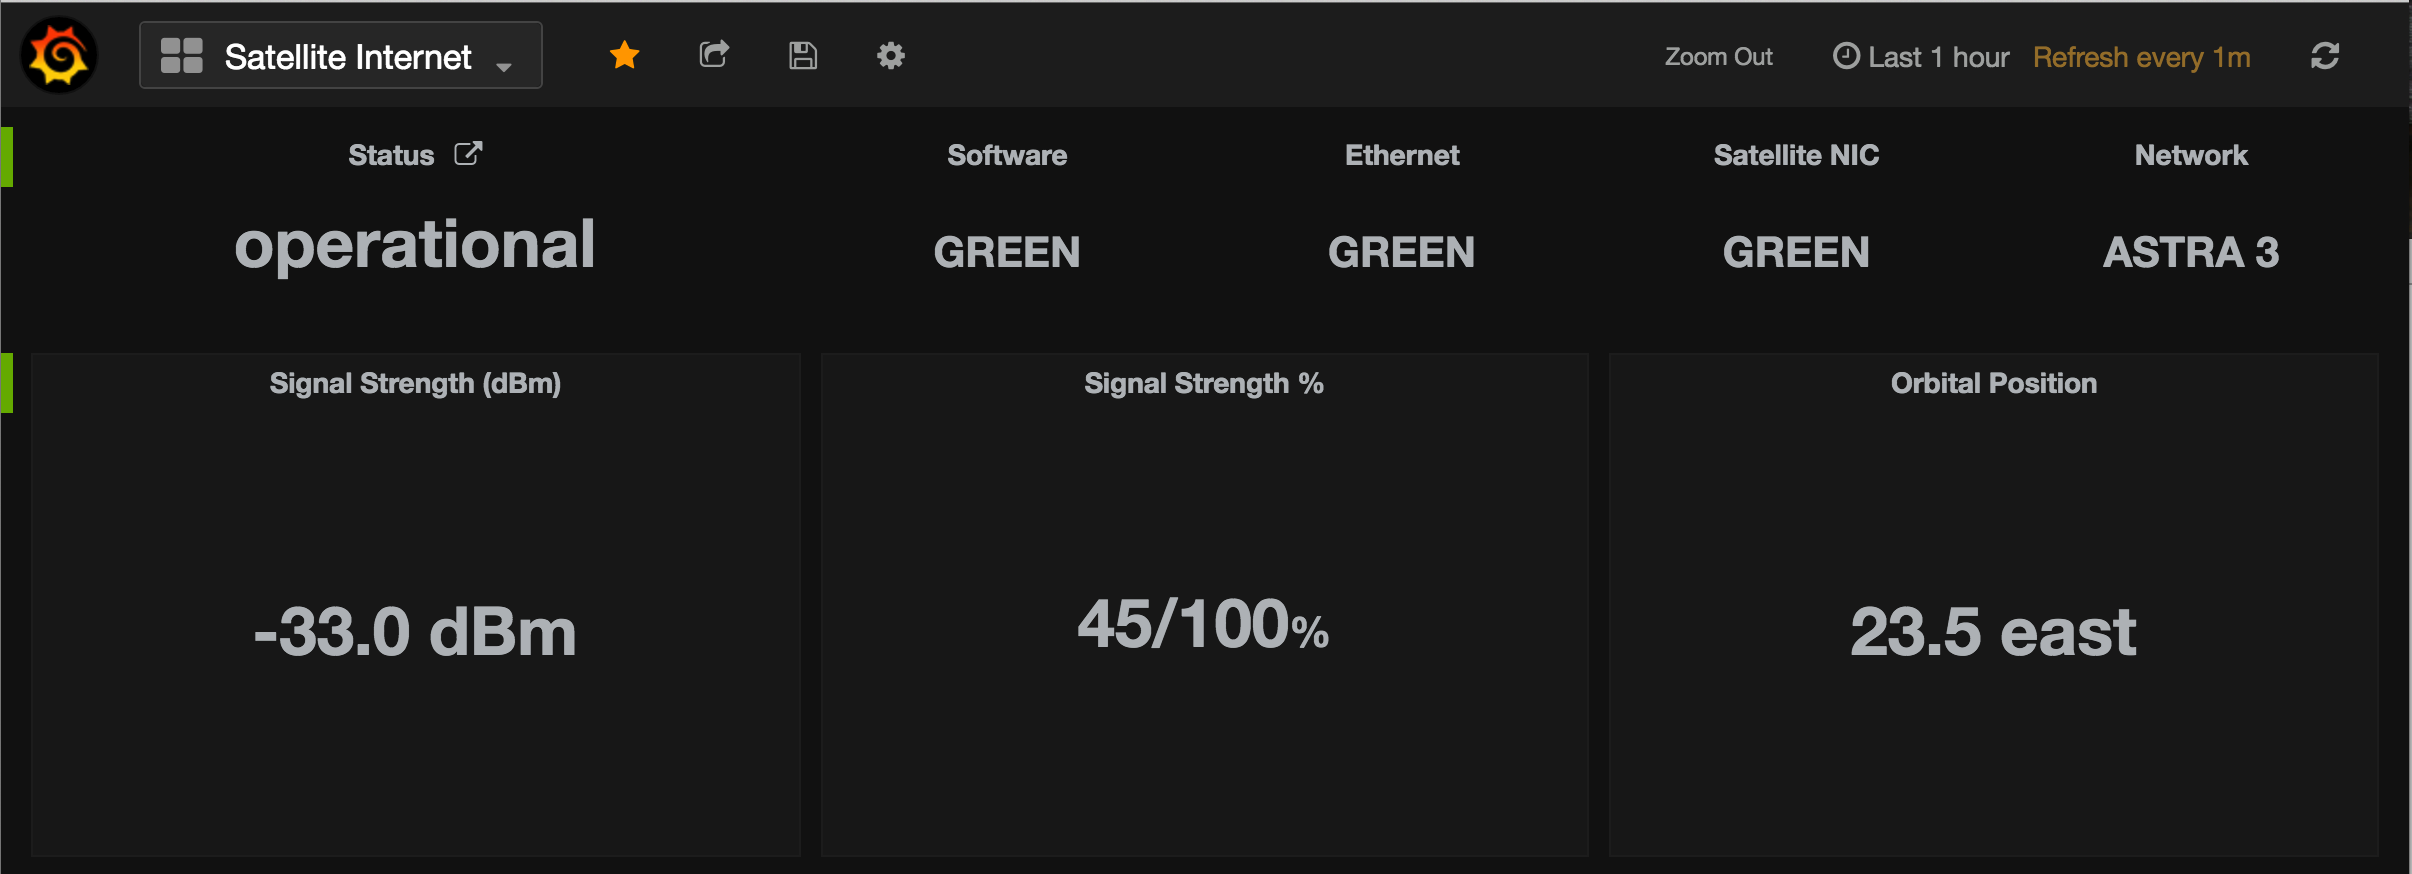
Grafana Dashboard
I've made a dashboard with some basic information about the connection. The collector script is executed by supervisord, which periodically collects statistics from the Newtec modem and posts them to InfluxDB.
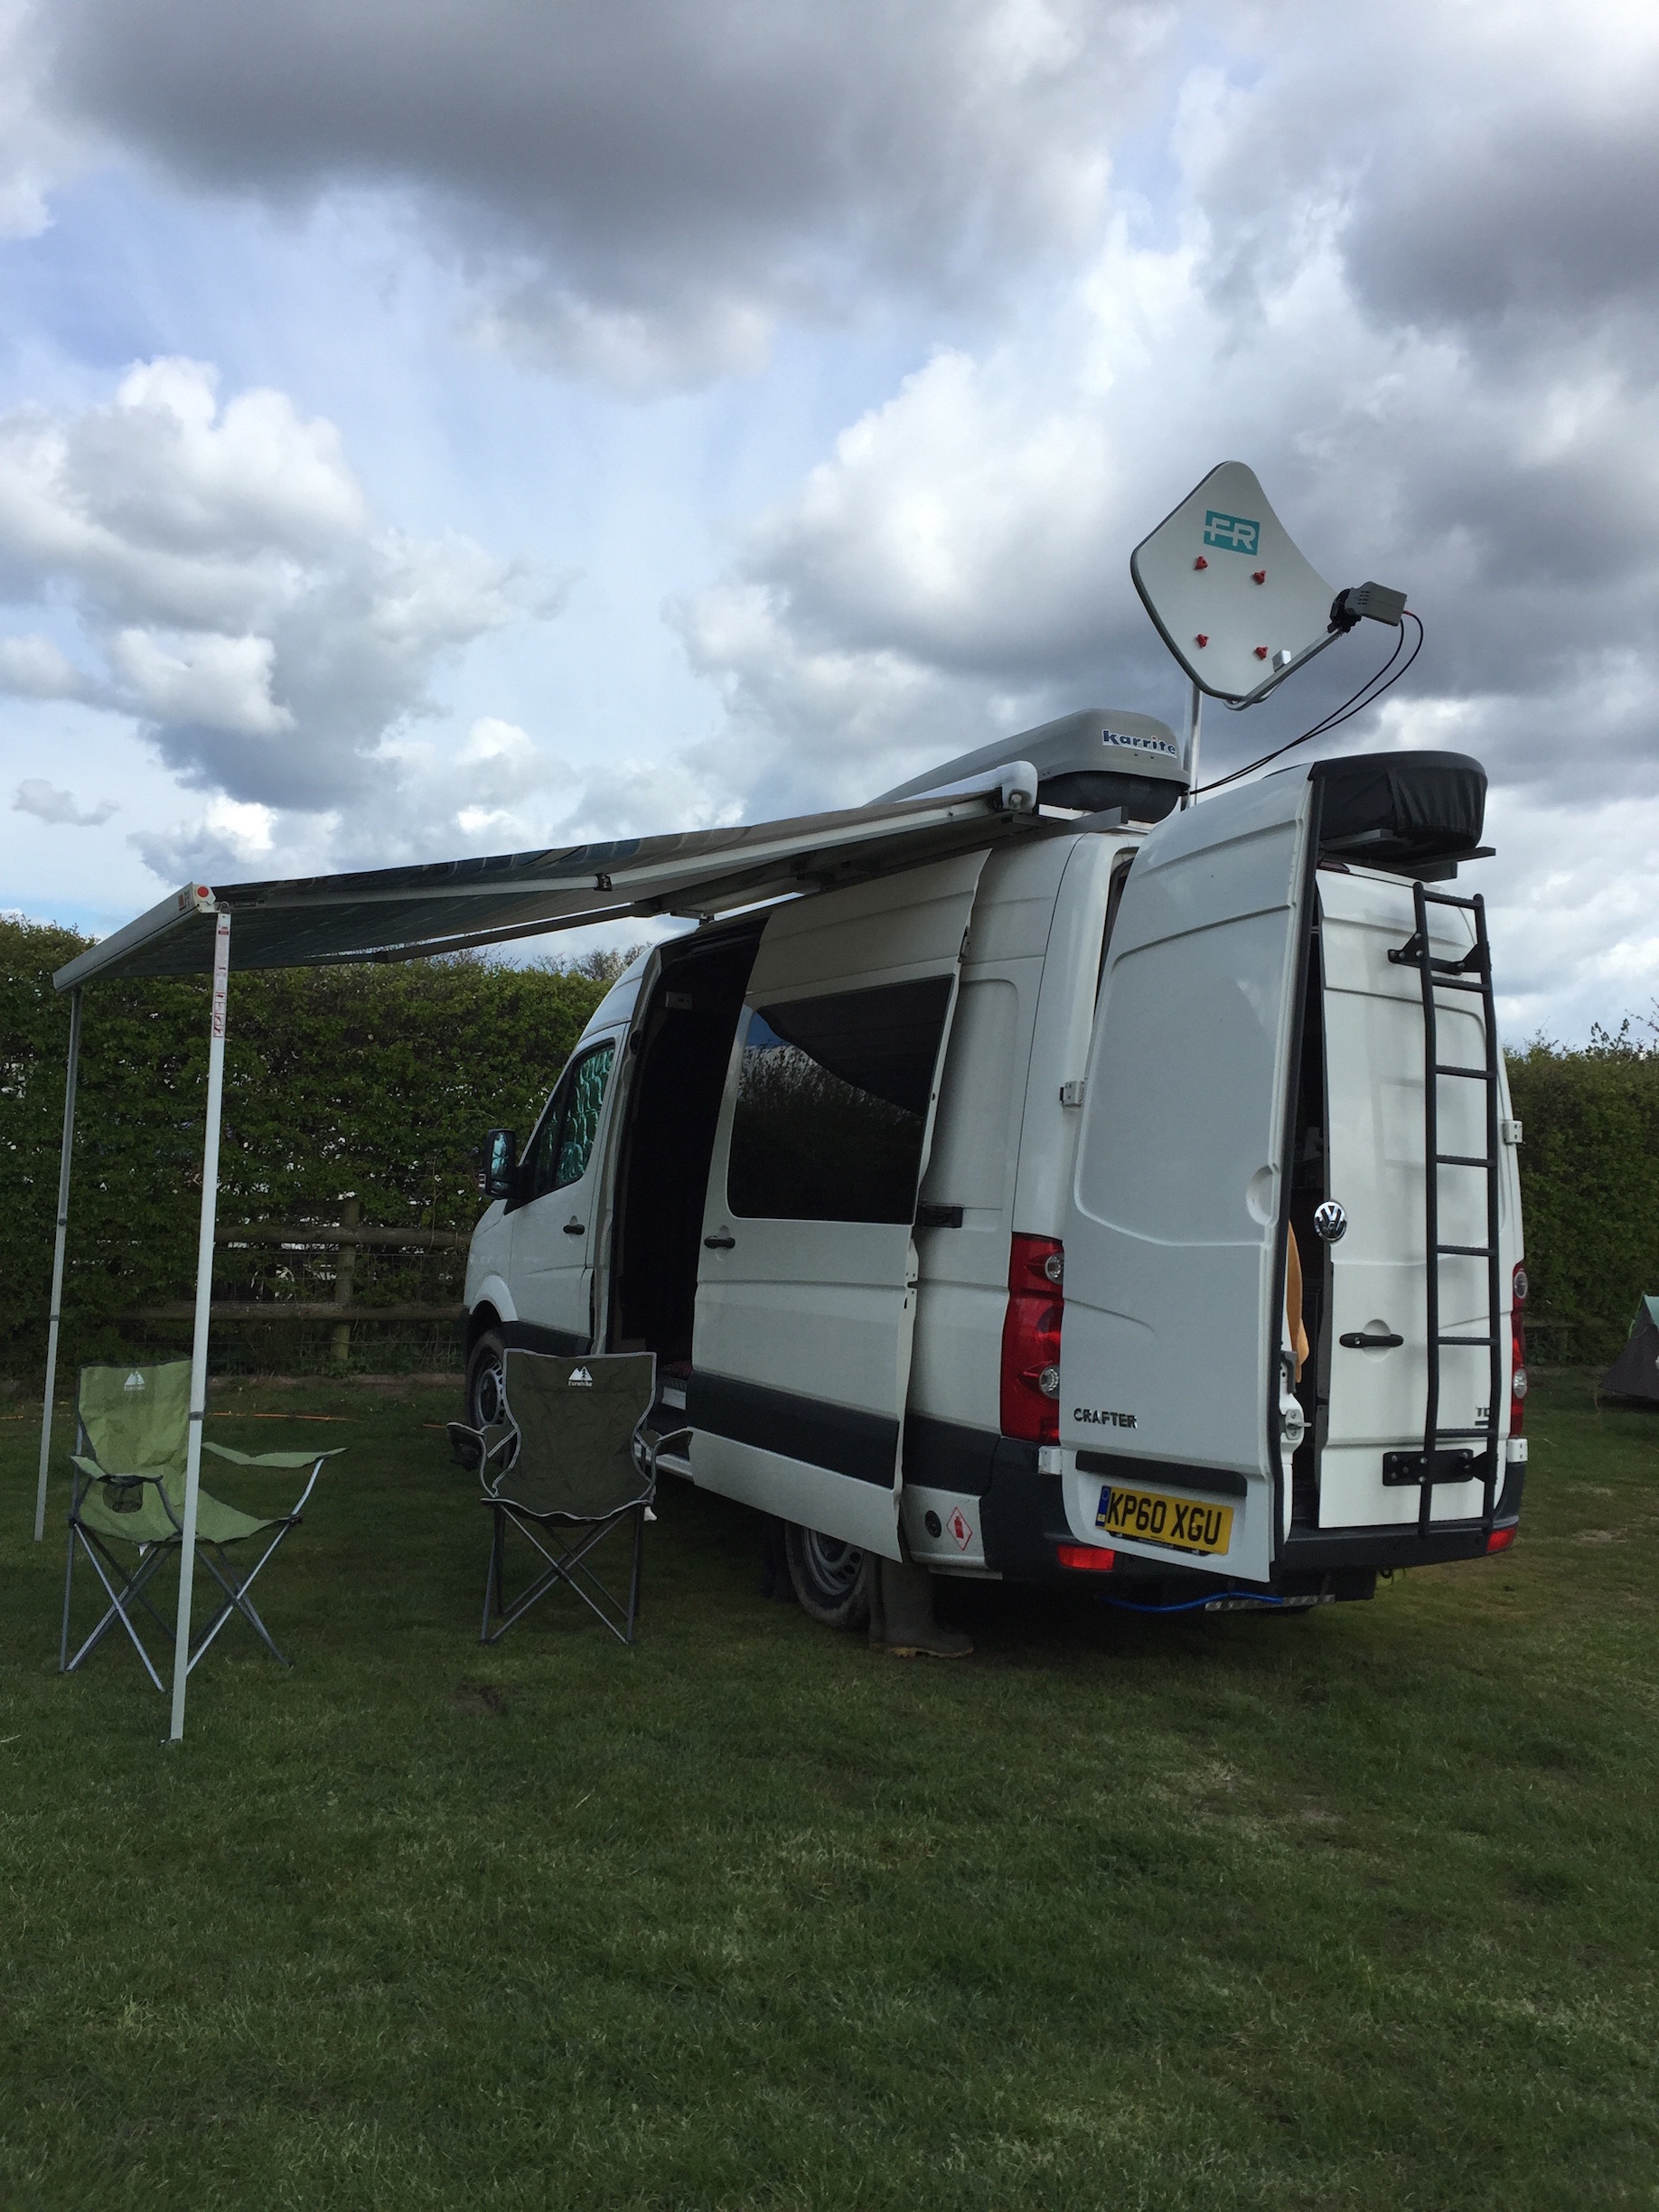
On The Roof
The dish mounts onto the 35mm square aluminium support bar, running across the rear of the spare tyre platform using the 2" x 2" (double) Shelley Mast Clamp.
I changed the stock M6 nuts and bolts, which attach the dish to the bracket with 16mm wing bolts and plastic thumb nuts.
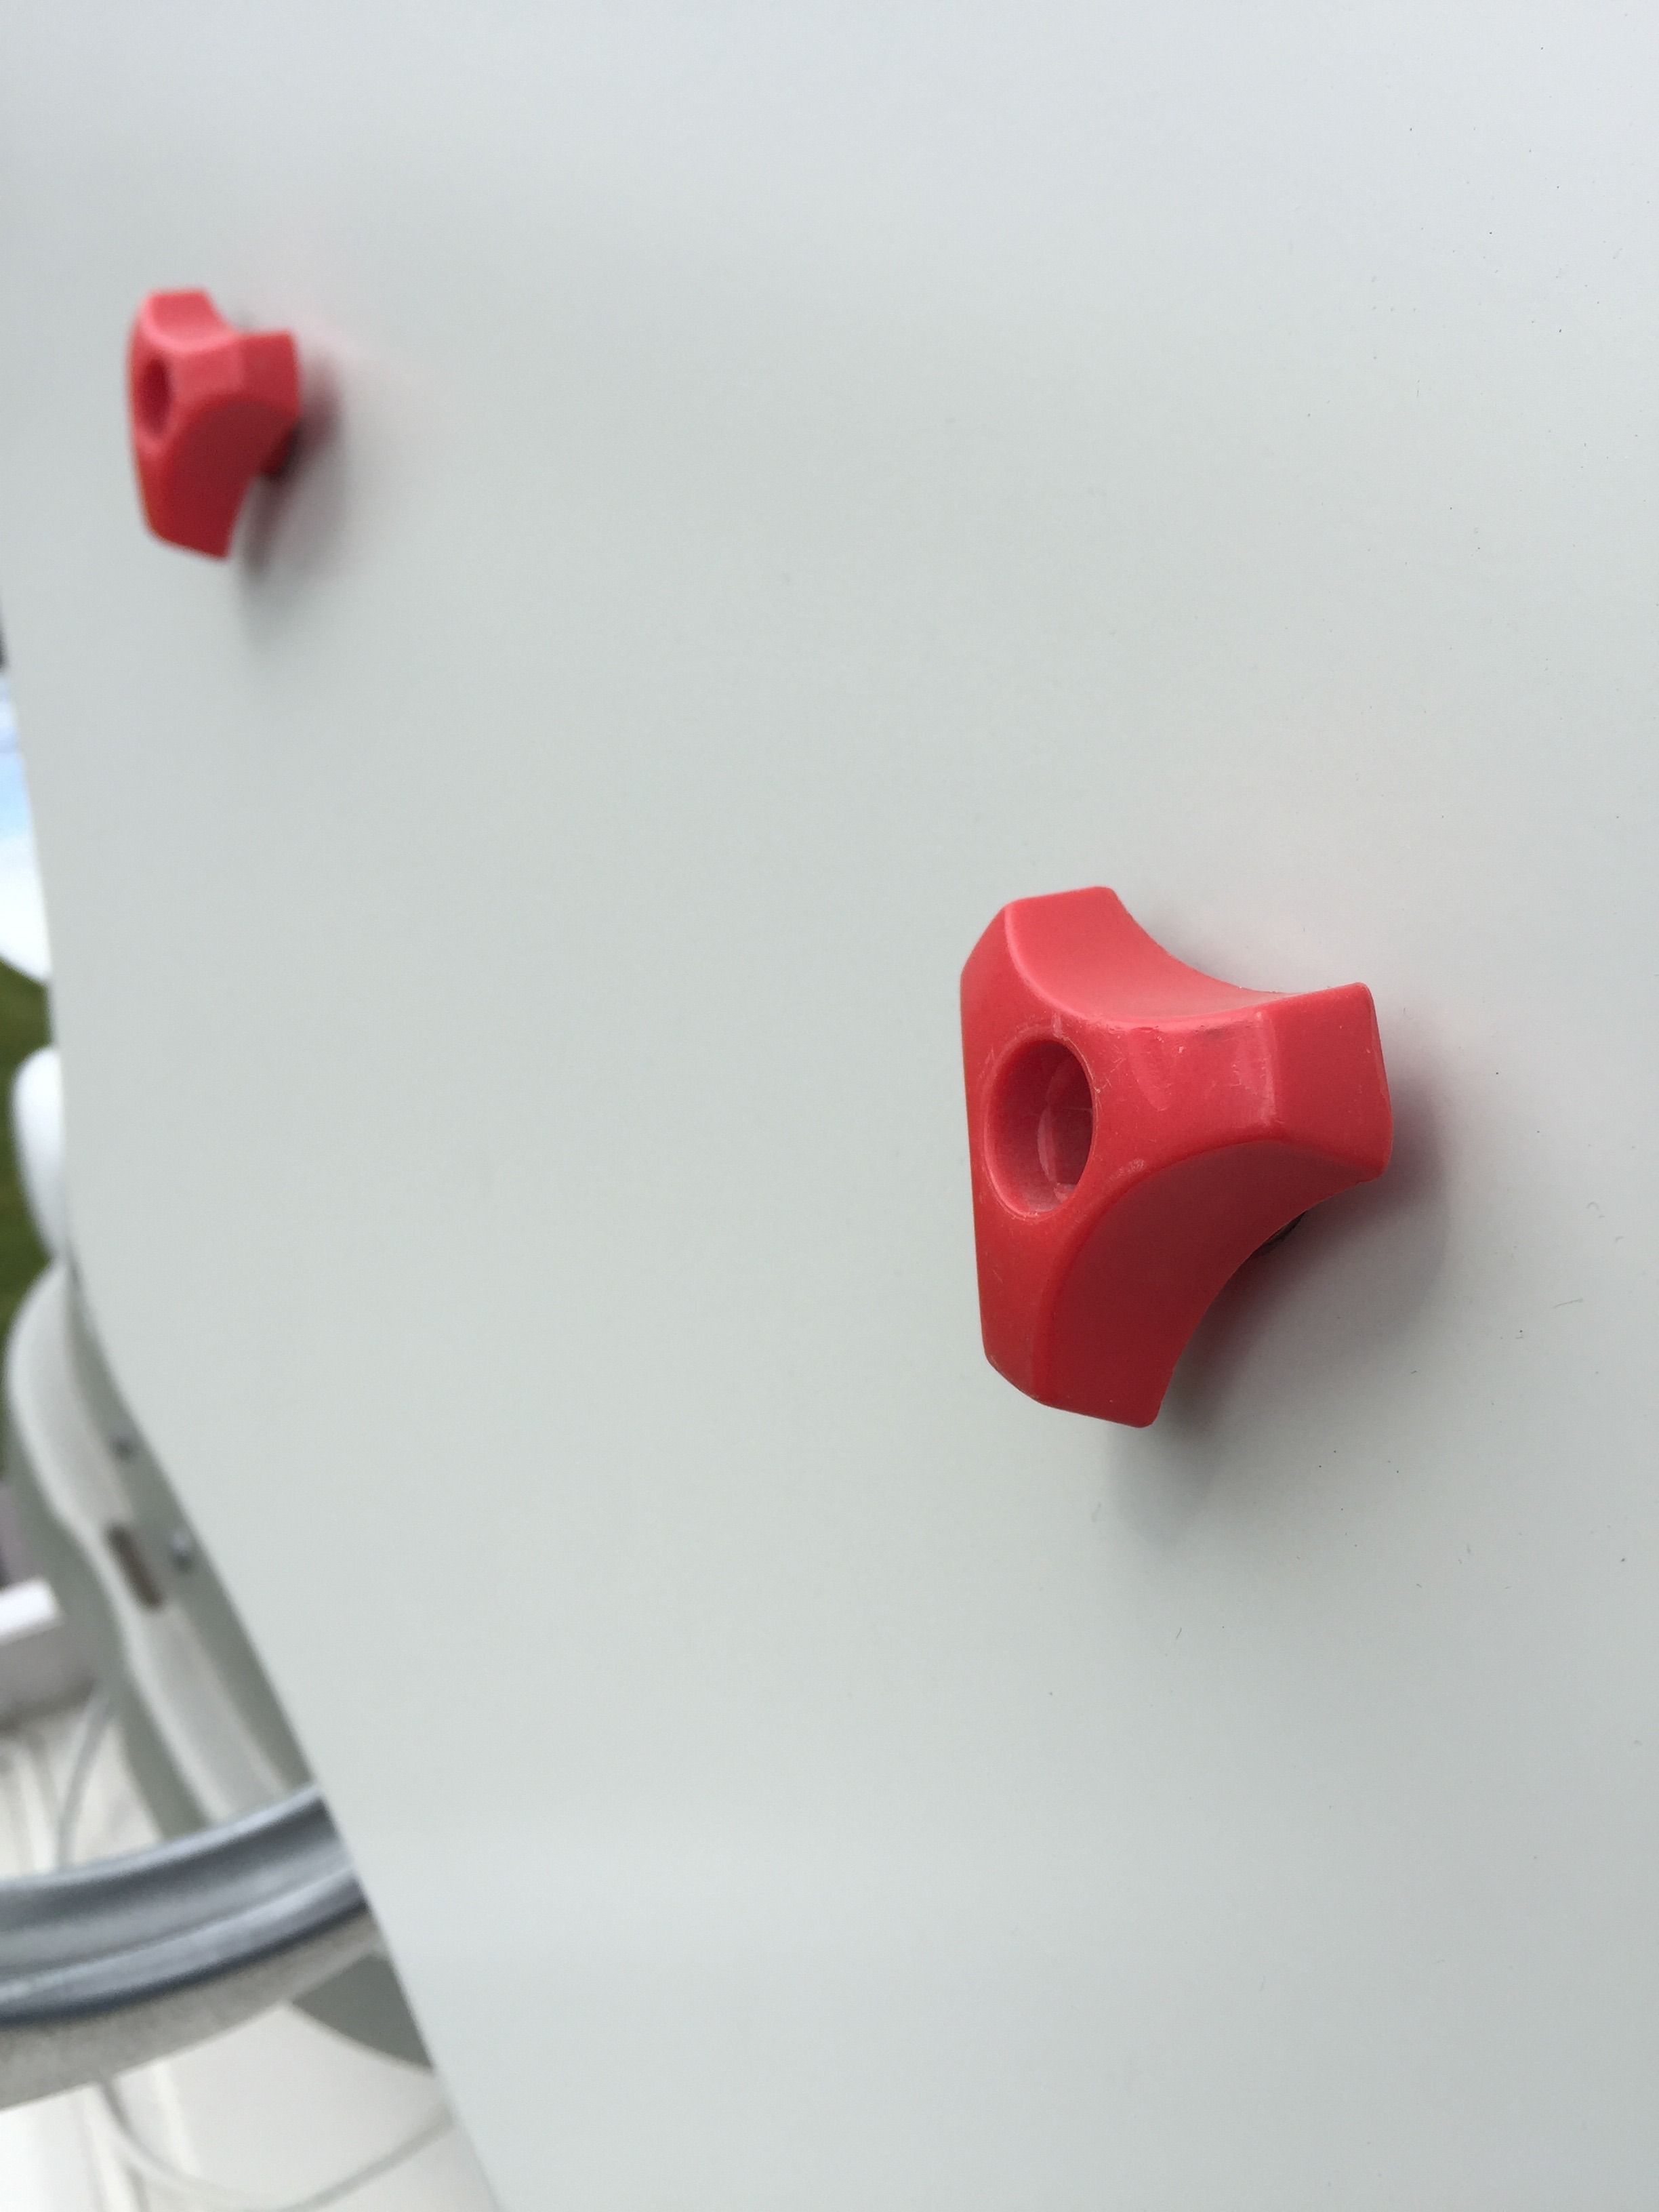
I also replaced the M6 nut holding the LNB clamp with a wing nut, to make it a bit quicker to assemble.
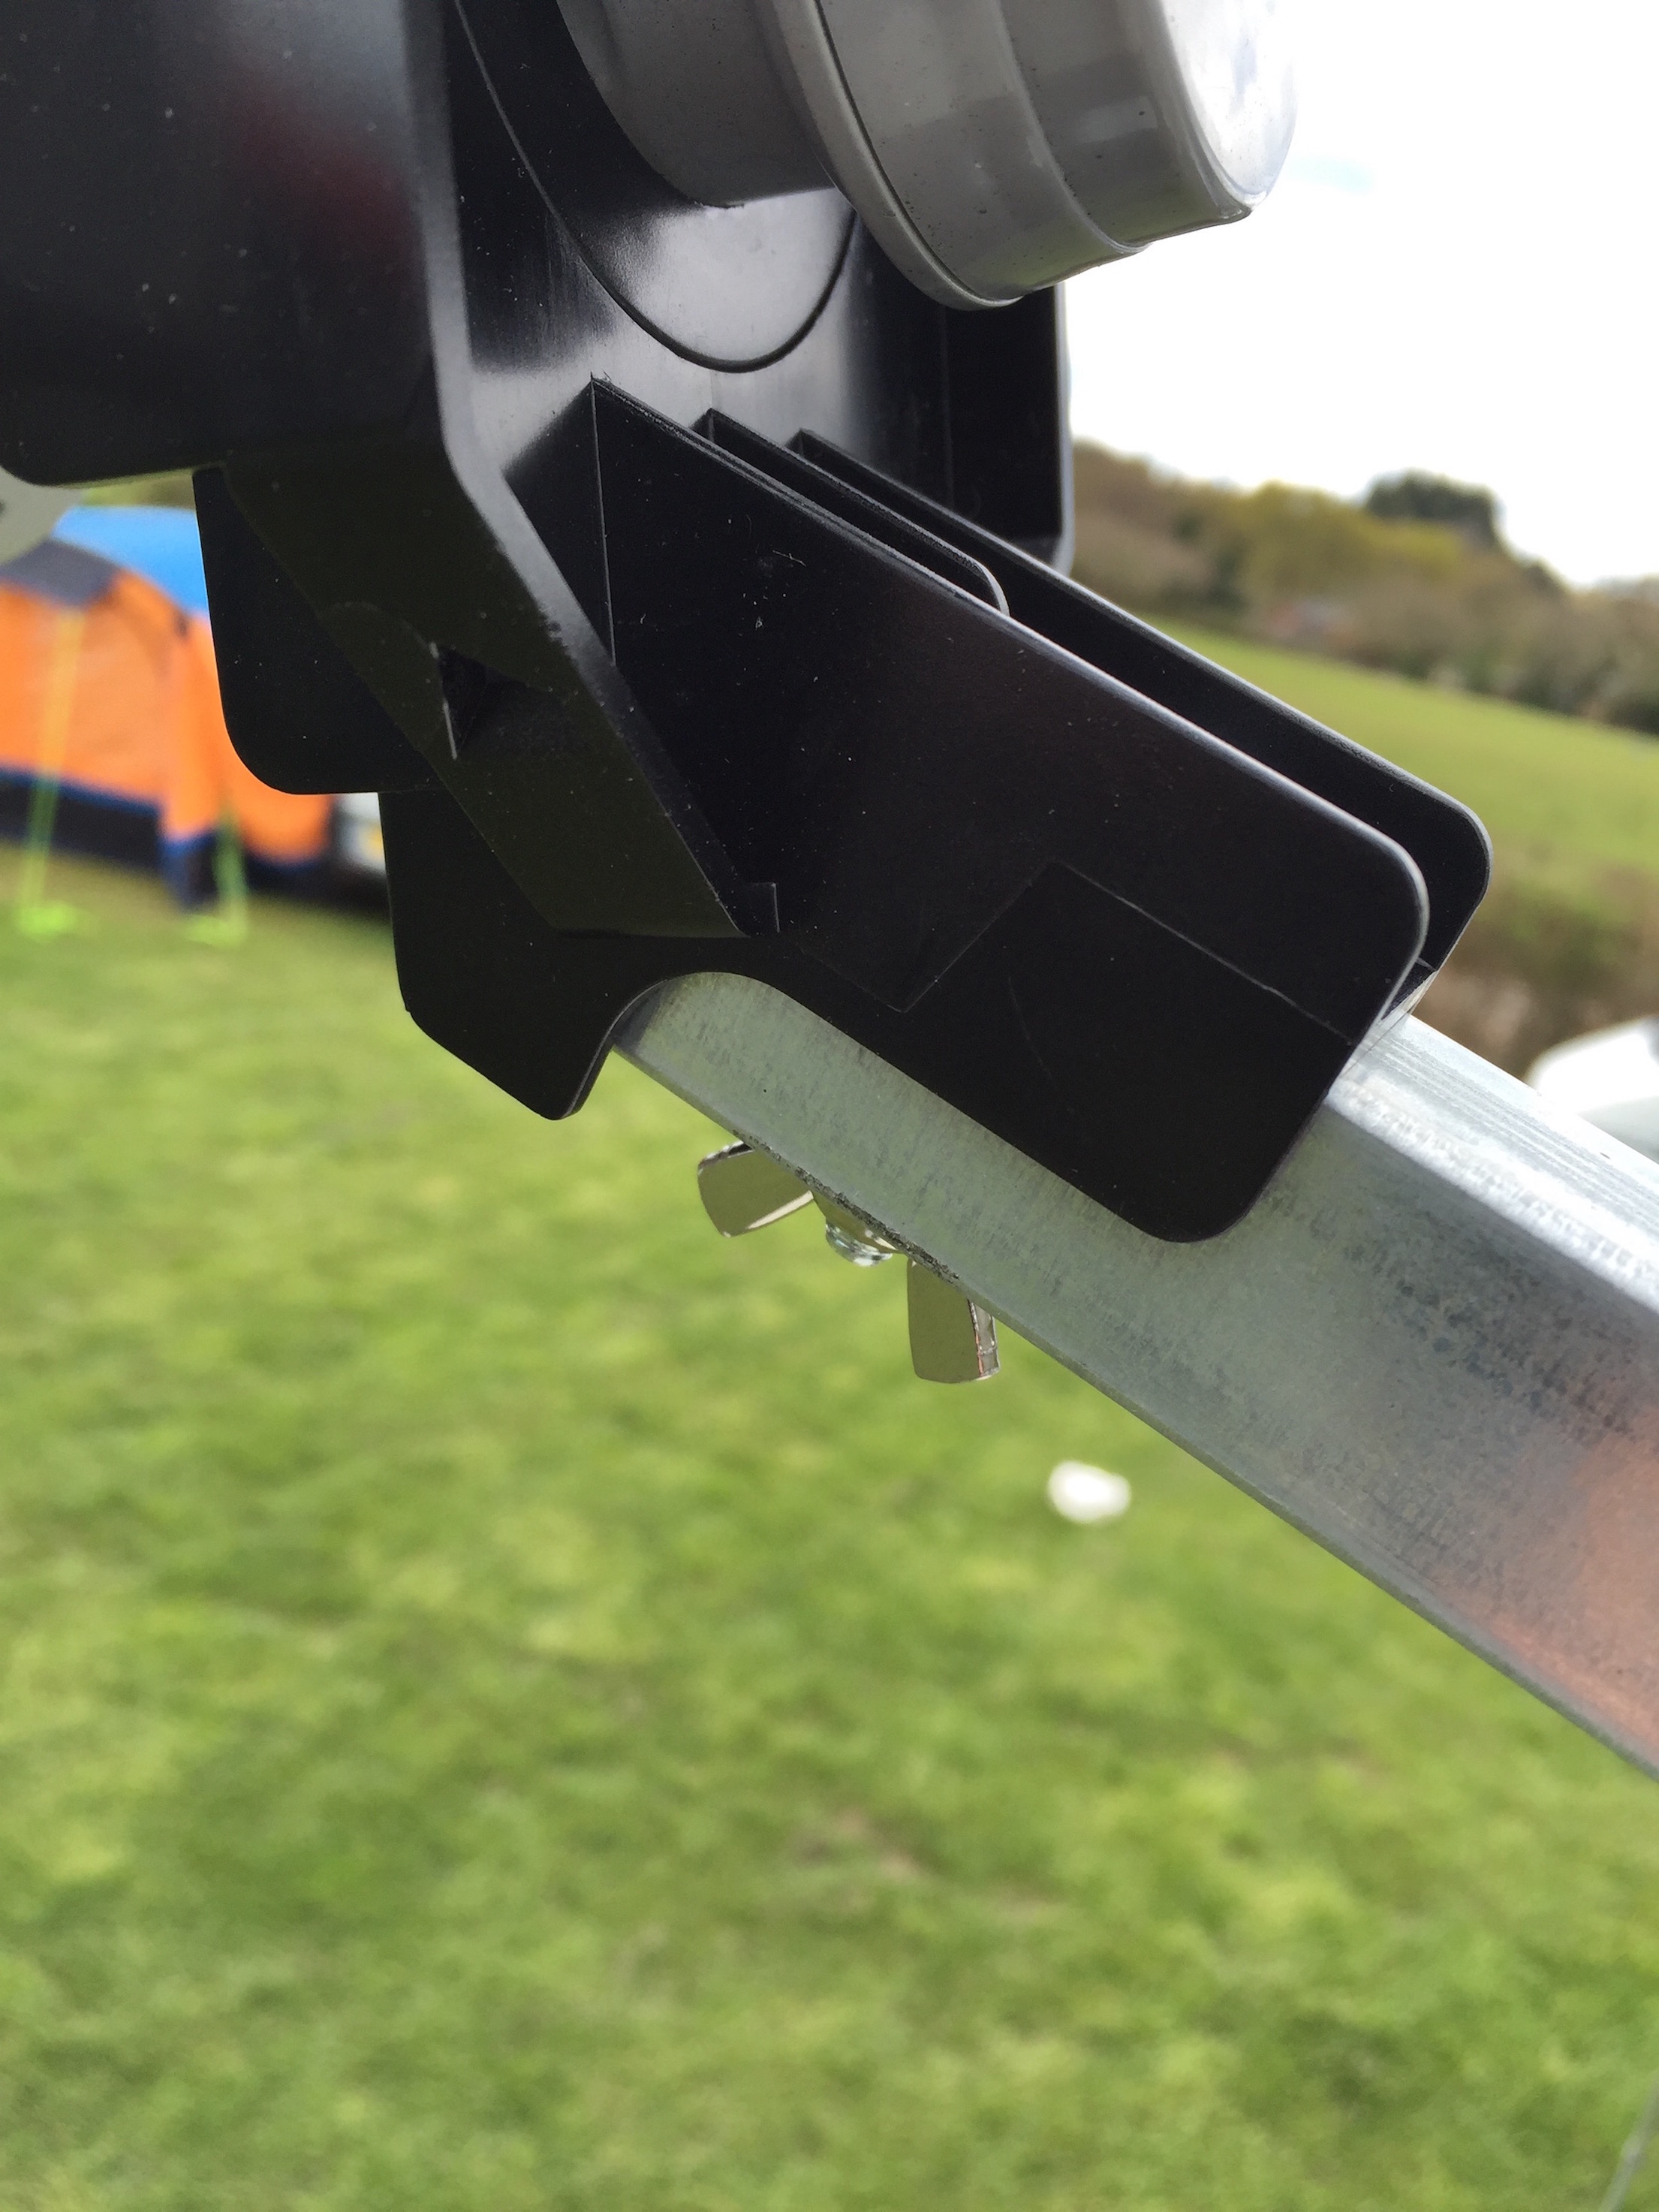
I kept the original M8 elevation and azimuth bolts and nuts, because they bear a bit more load and must be tightened with a spanner to prevent the whole thing from flying away.
Once assembled, the 15VDC is injected via a passive PoE splitter, wired in the electronics closet.
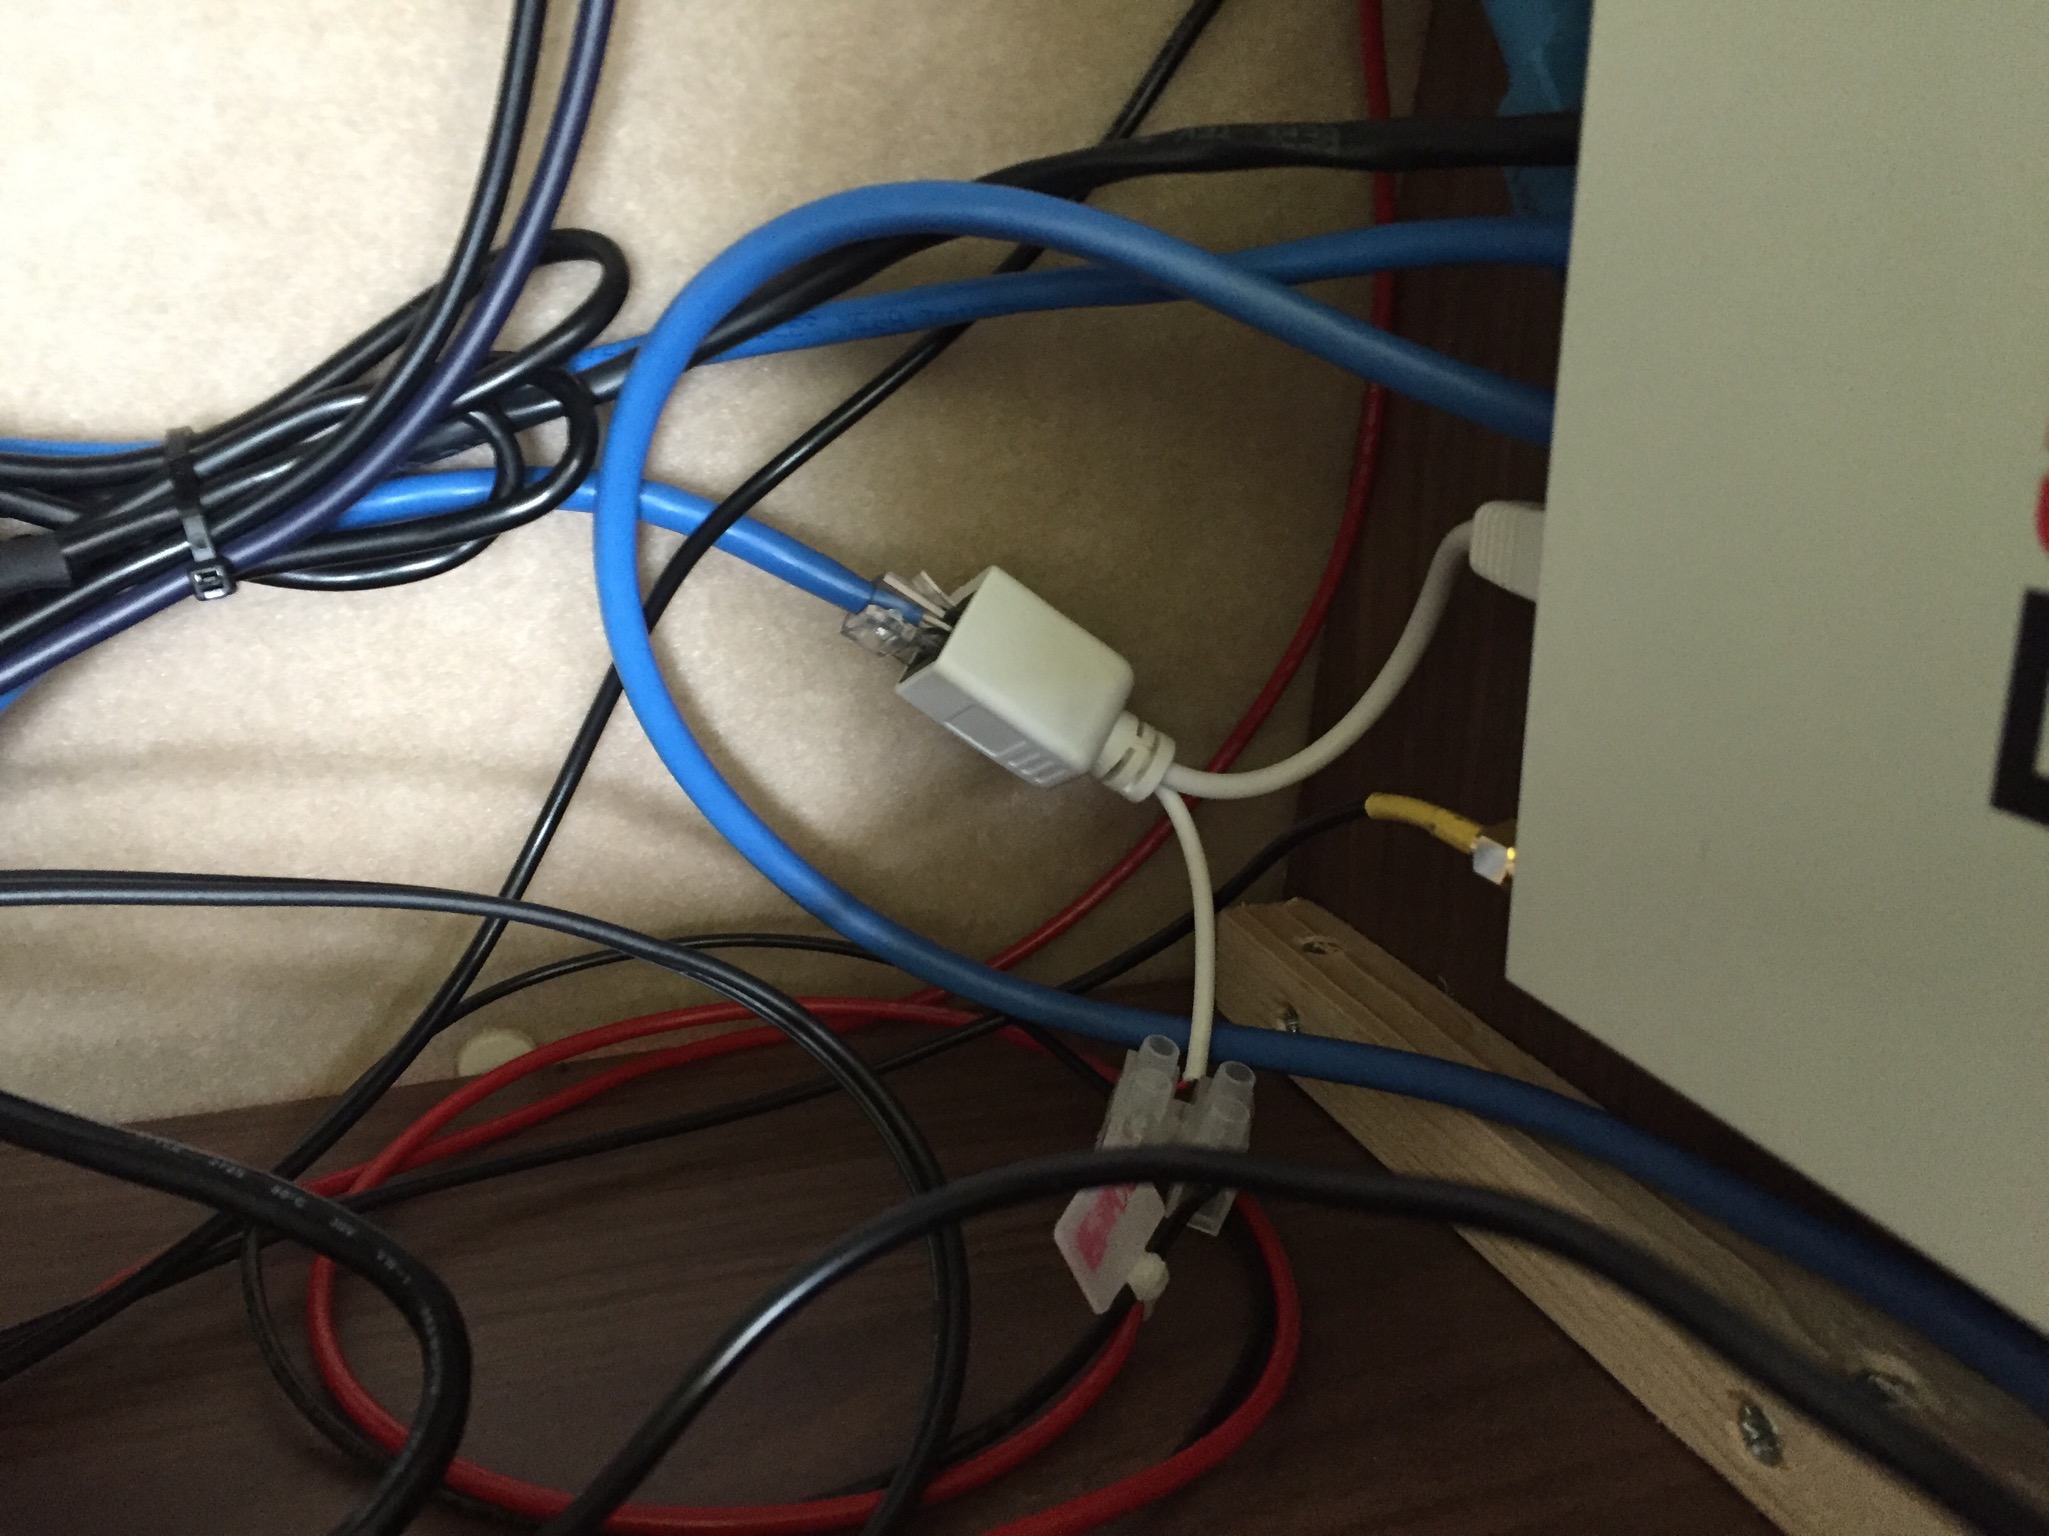
The CAT5 cable runs to the waterproof socket/gland under the solar panel, which is in turn connected to a length of CAT5 cable running under the solar panels and into the roof box, where the satellite modem is located. The RF cabling also enters the roof box via the same means.
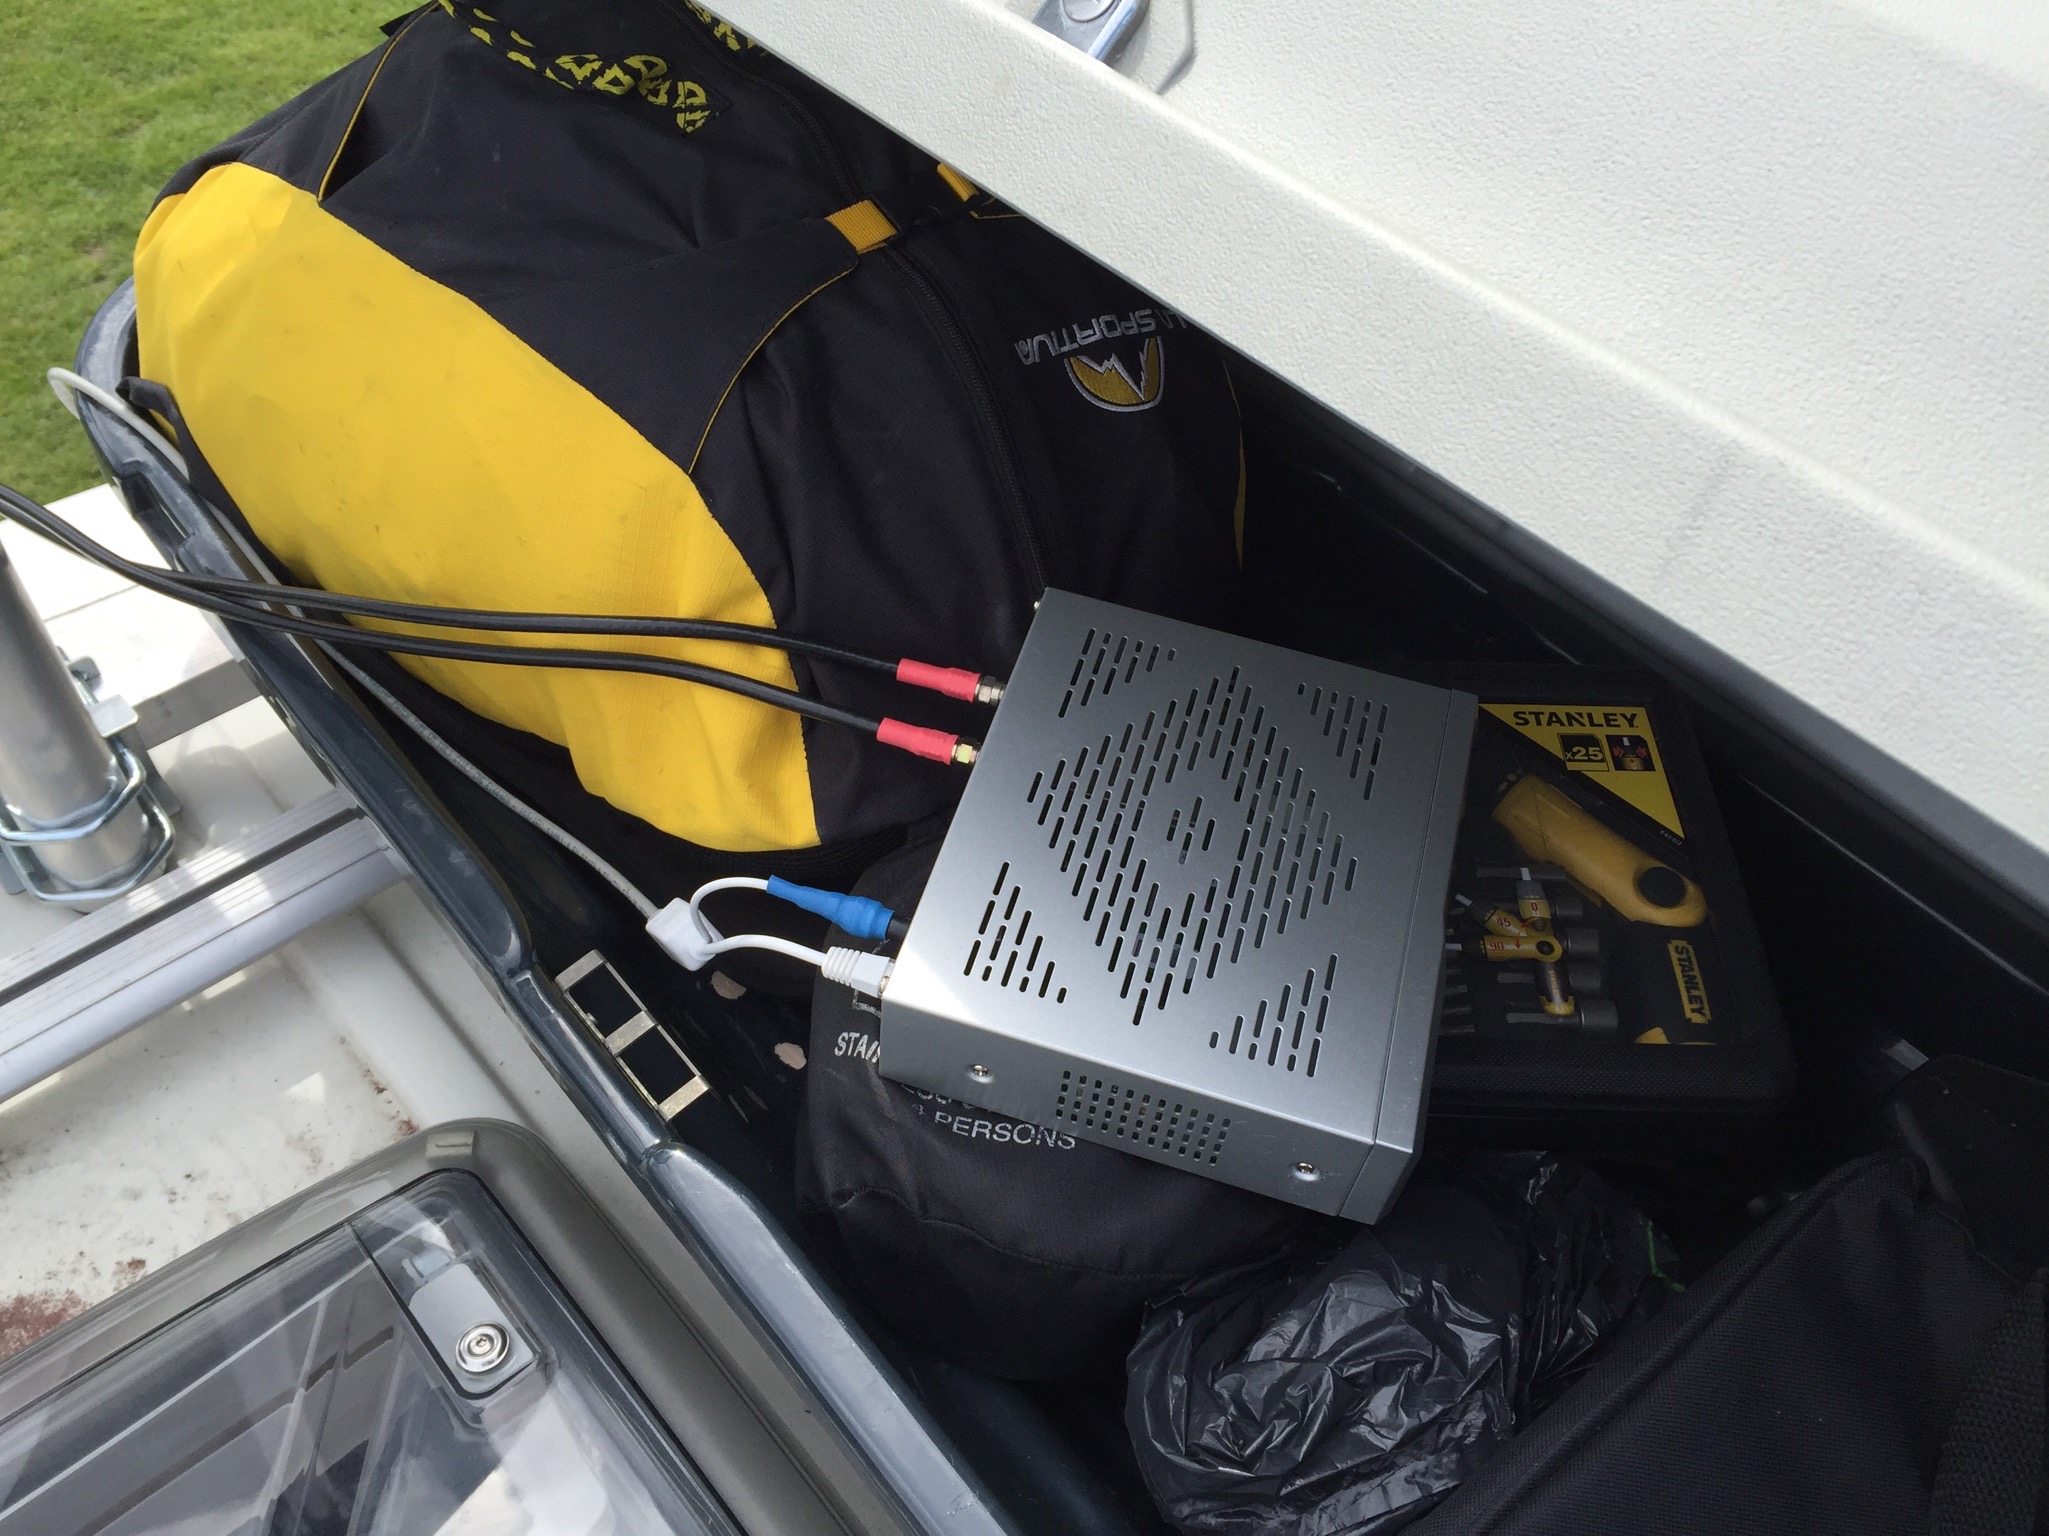

Depending on the orientation of the dish, the modem can also be located in the spare tyre bowl.
Storage
When not in use, the dish conveniently packs away in the dead space behind the table top.
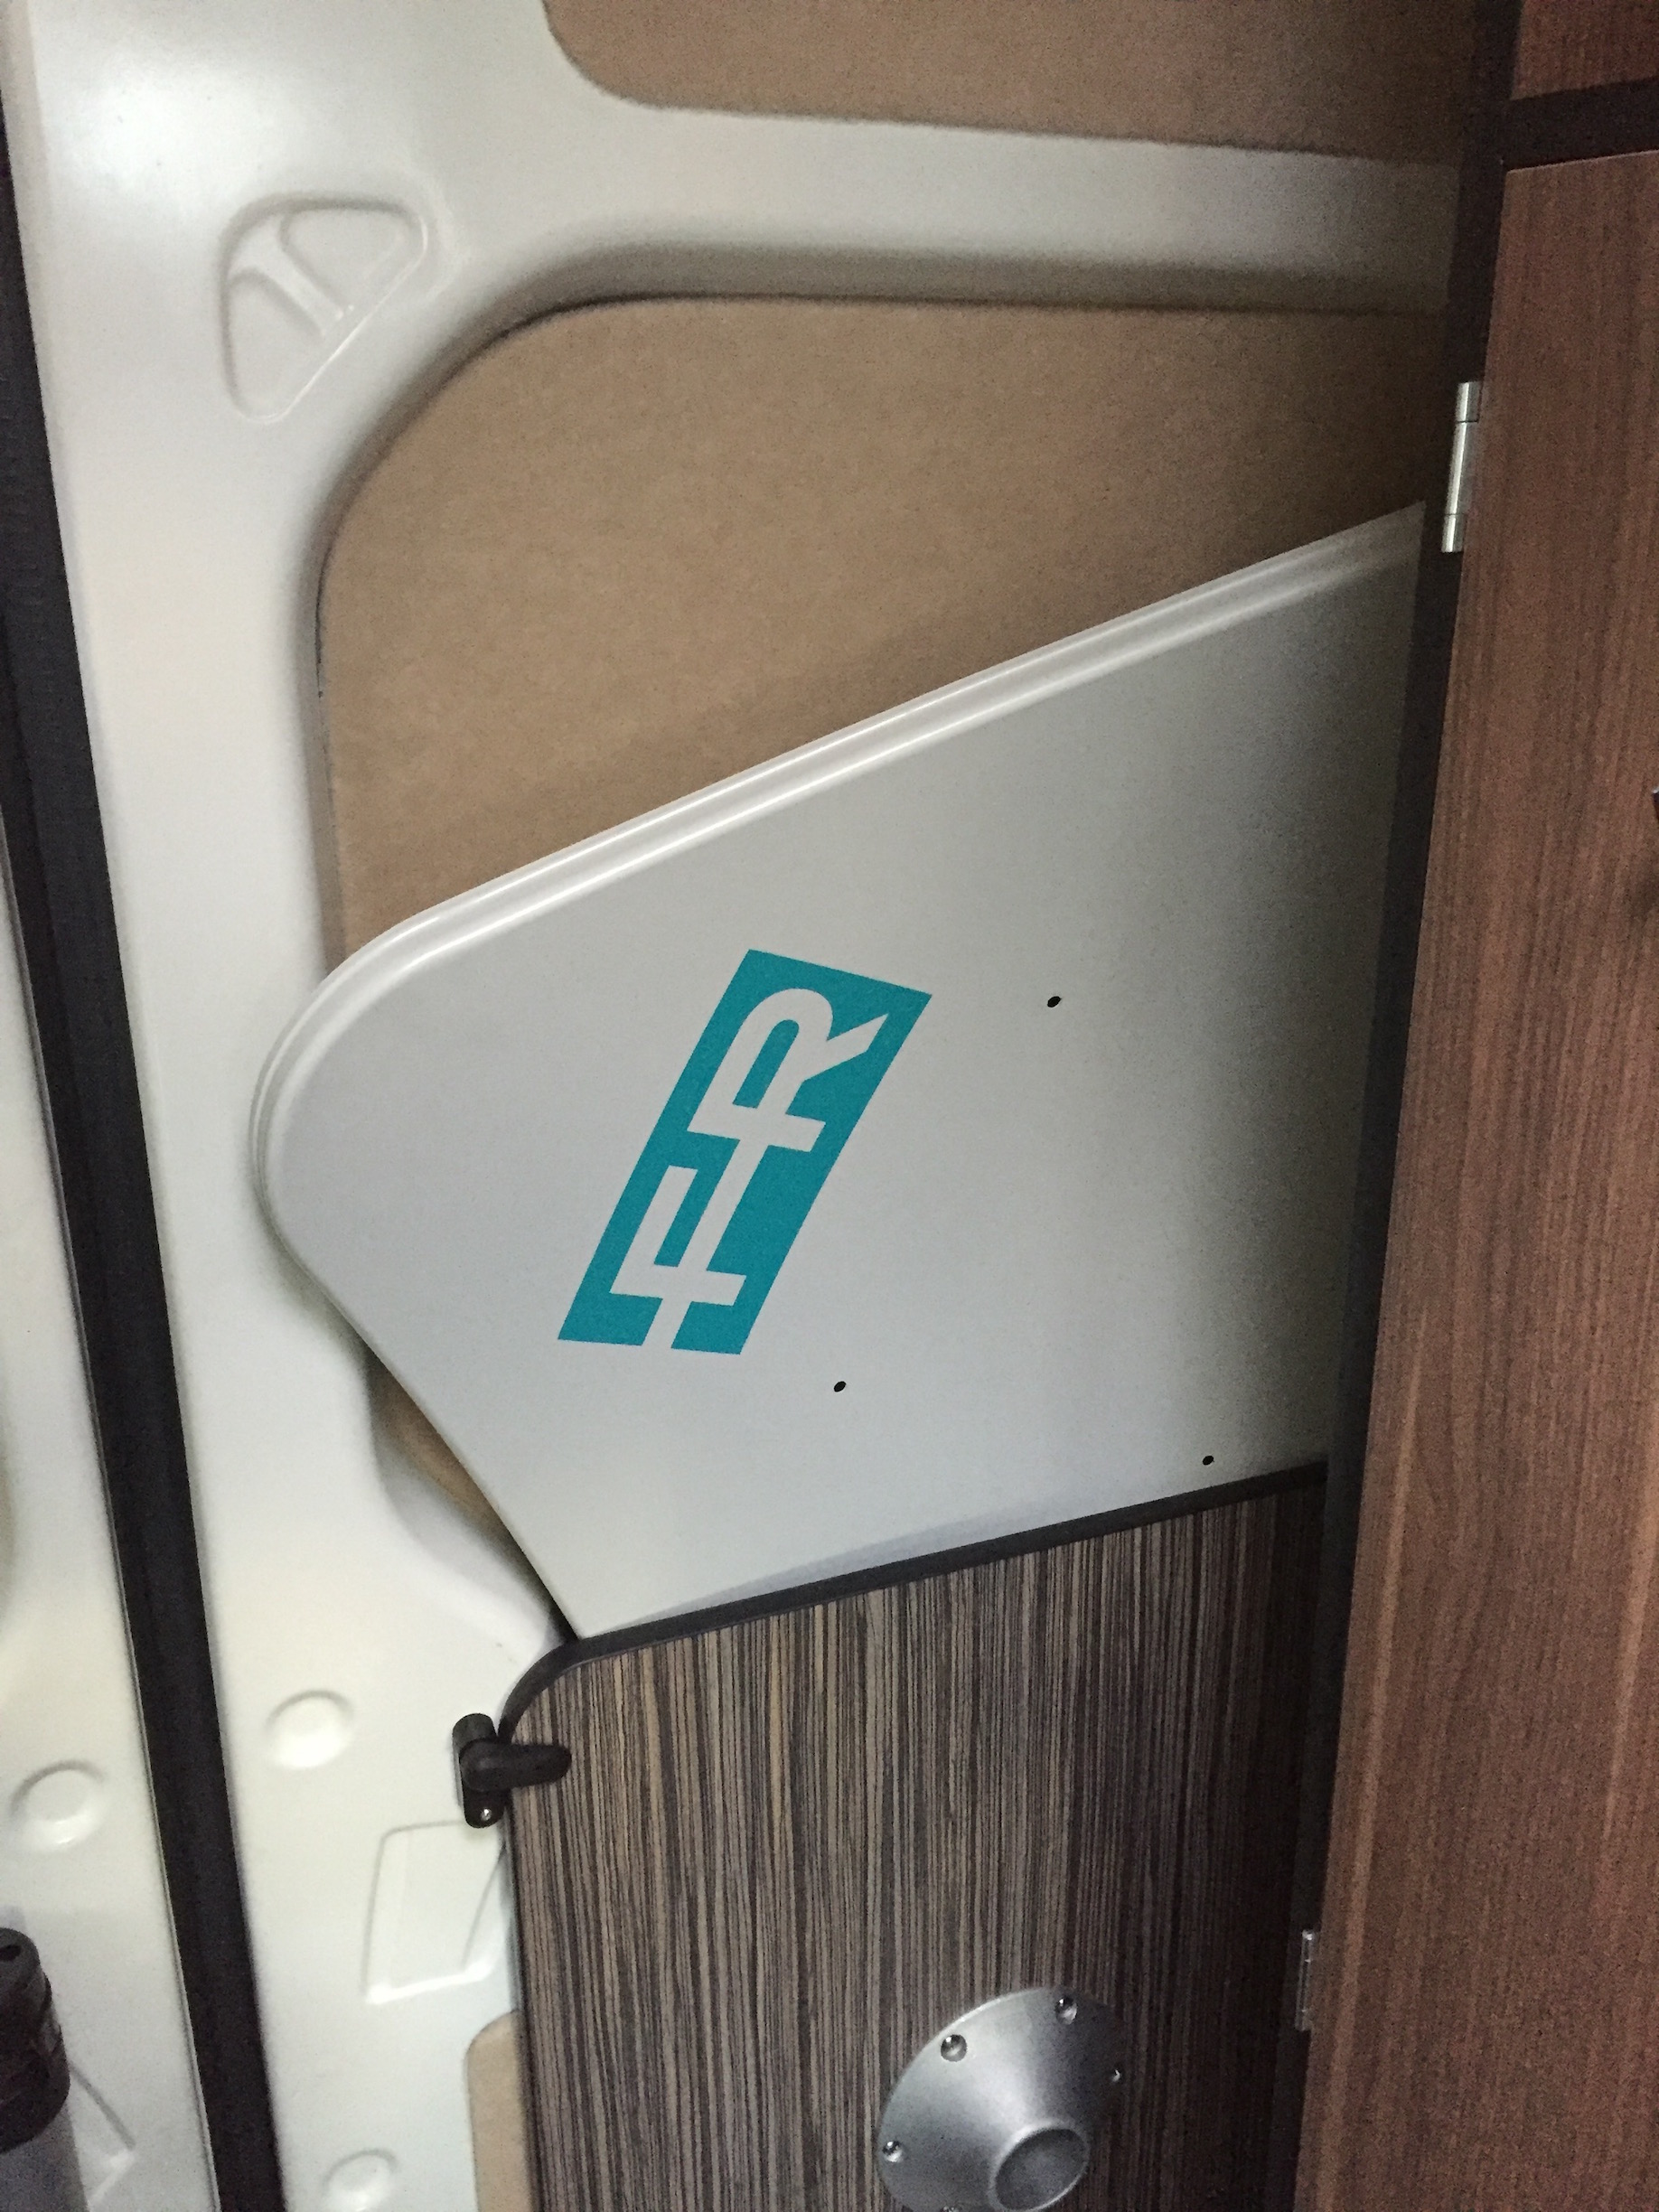
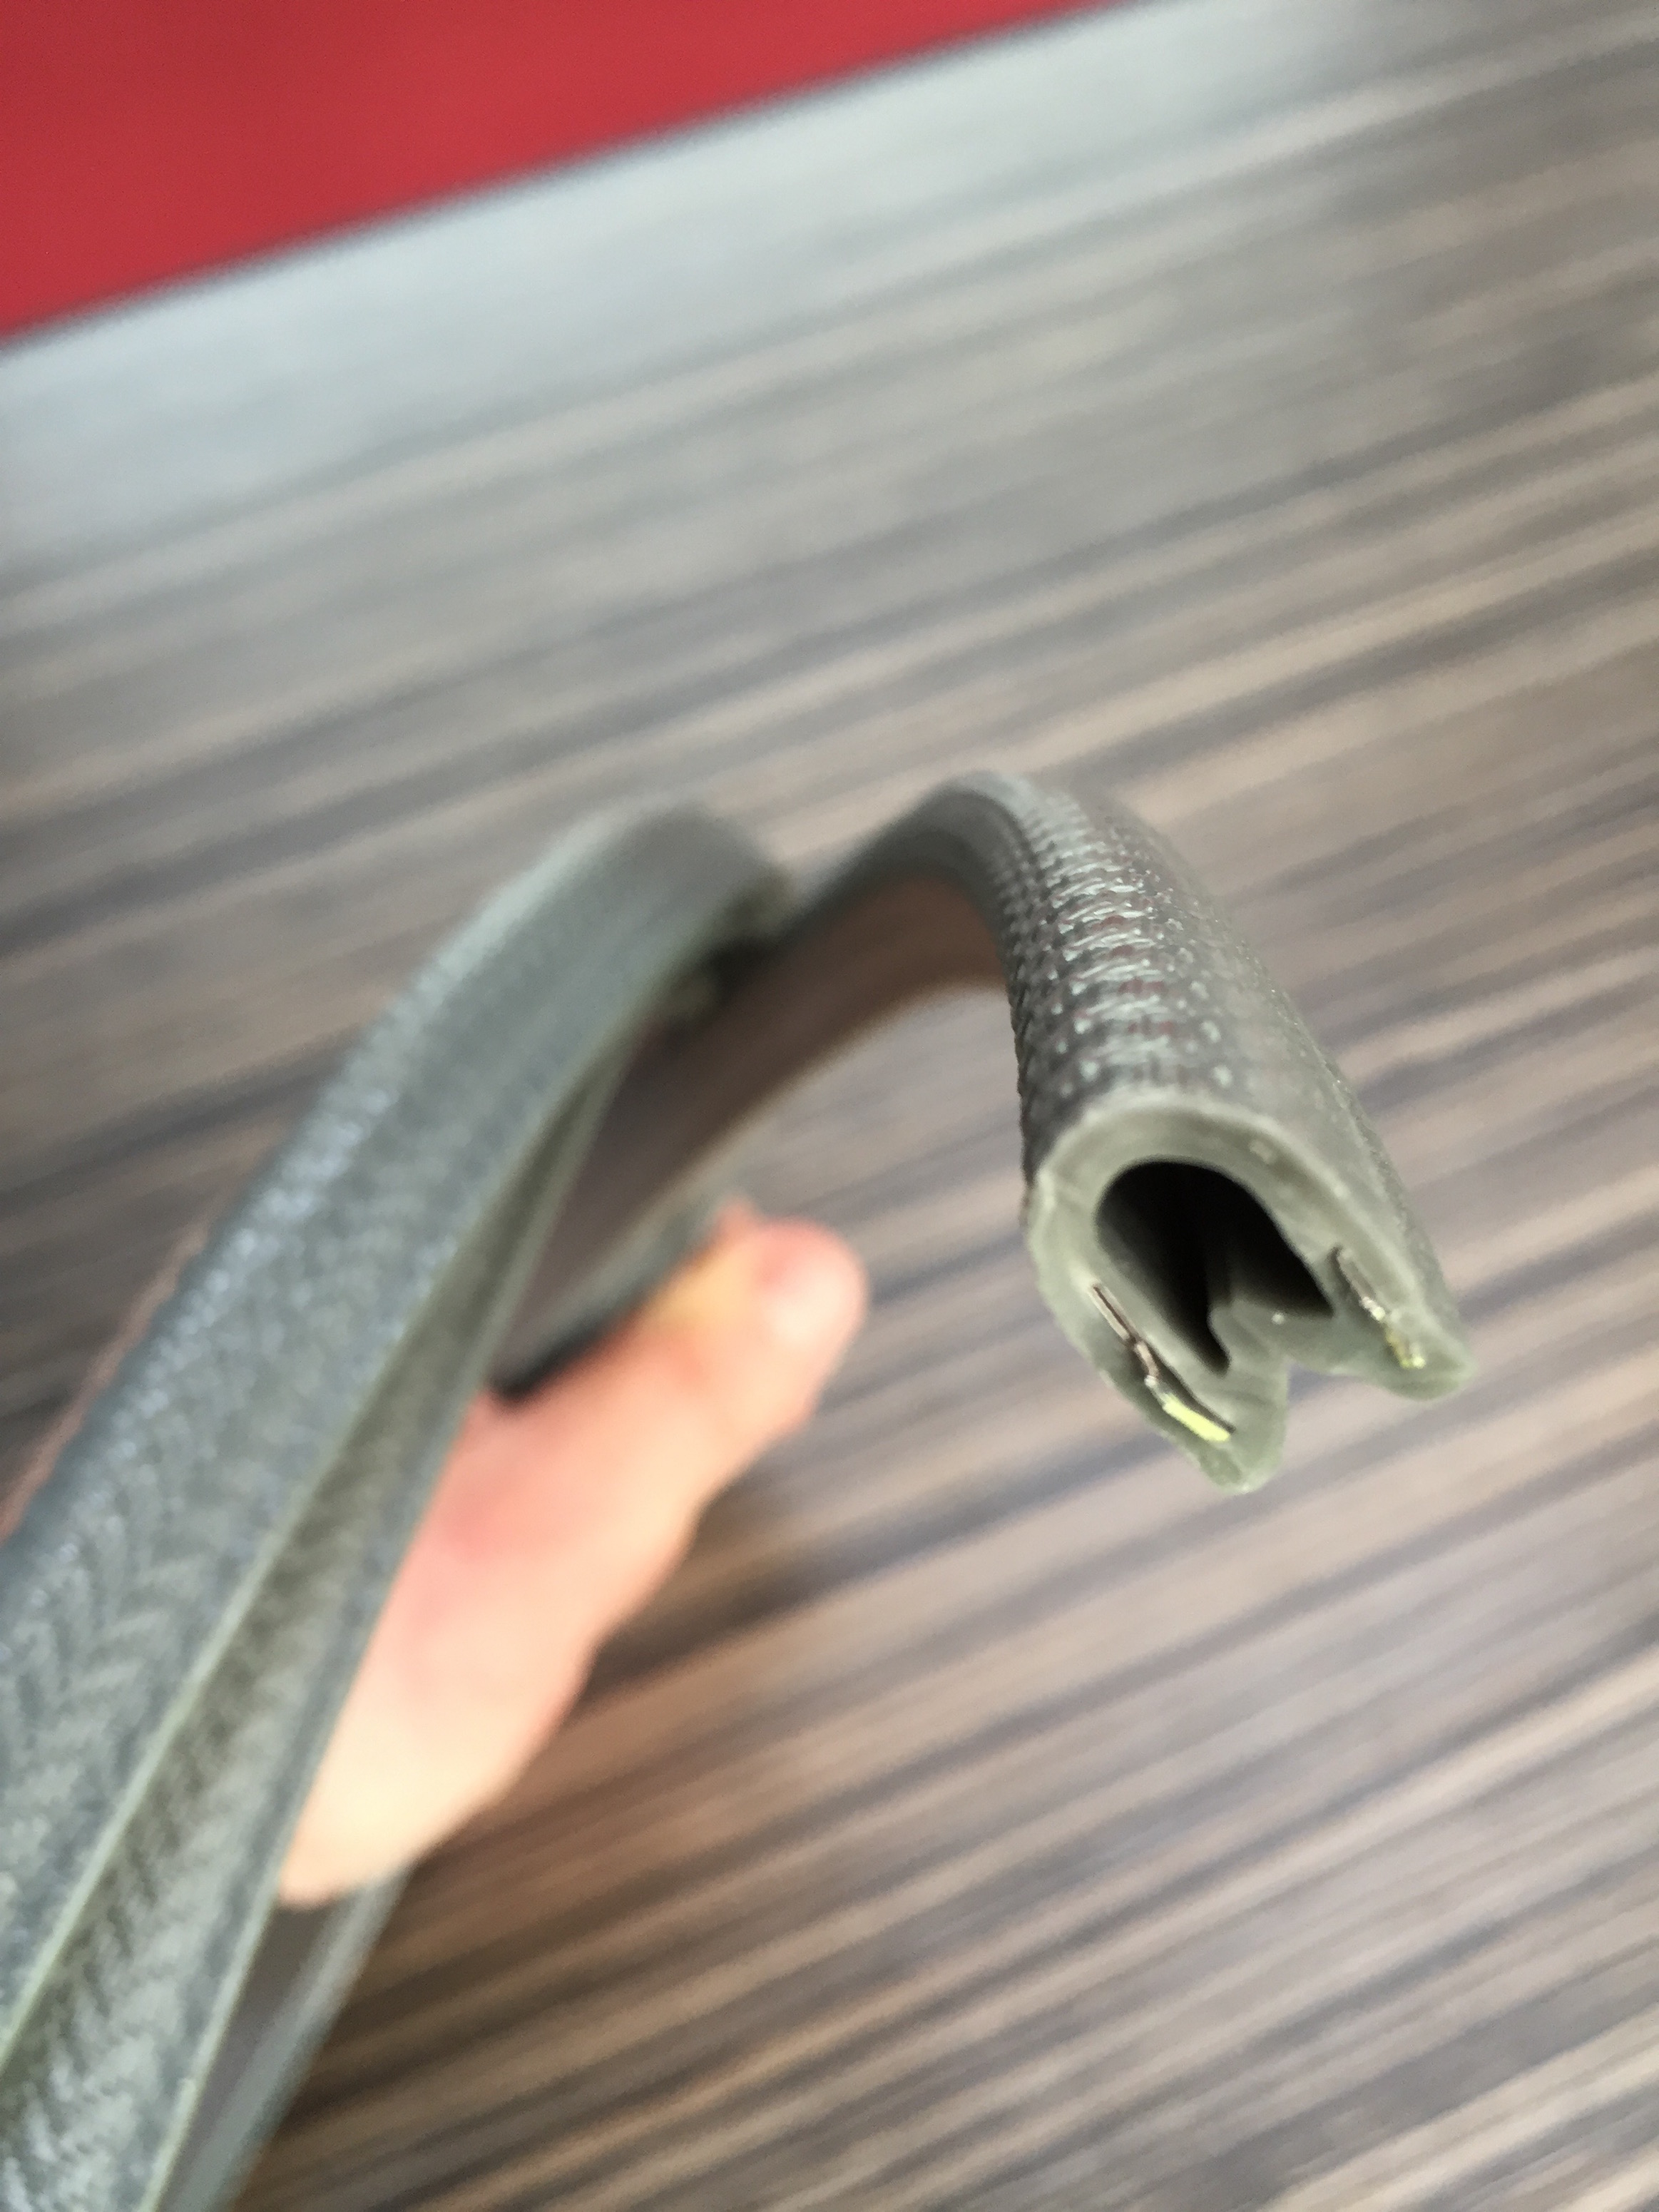
Automotive door trim around the dish edge helps avoid scratching the paint work and keeps the rattle to the minimum.
The rest of the kit just goes into the roof box and the bowl of the spare tyre.
Next up...
We need to make some side window insulating covers and get some bits and pieces to comply with various EU regulations, but as far as all the major components are concerned, we are done.
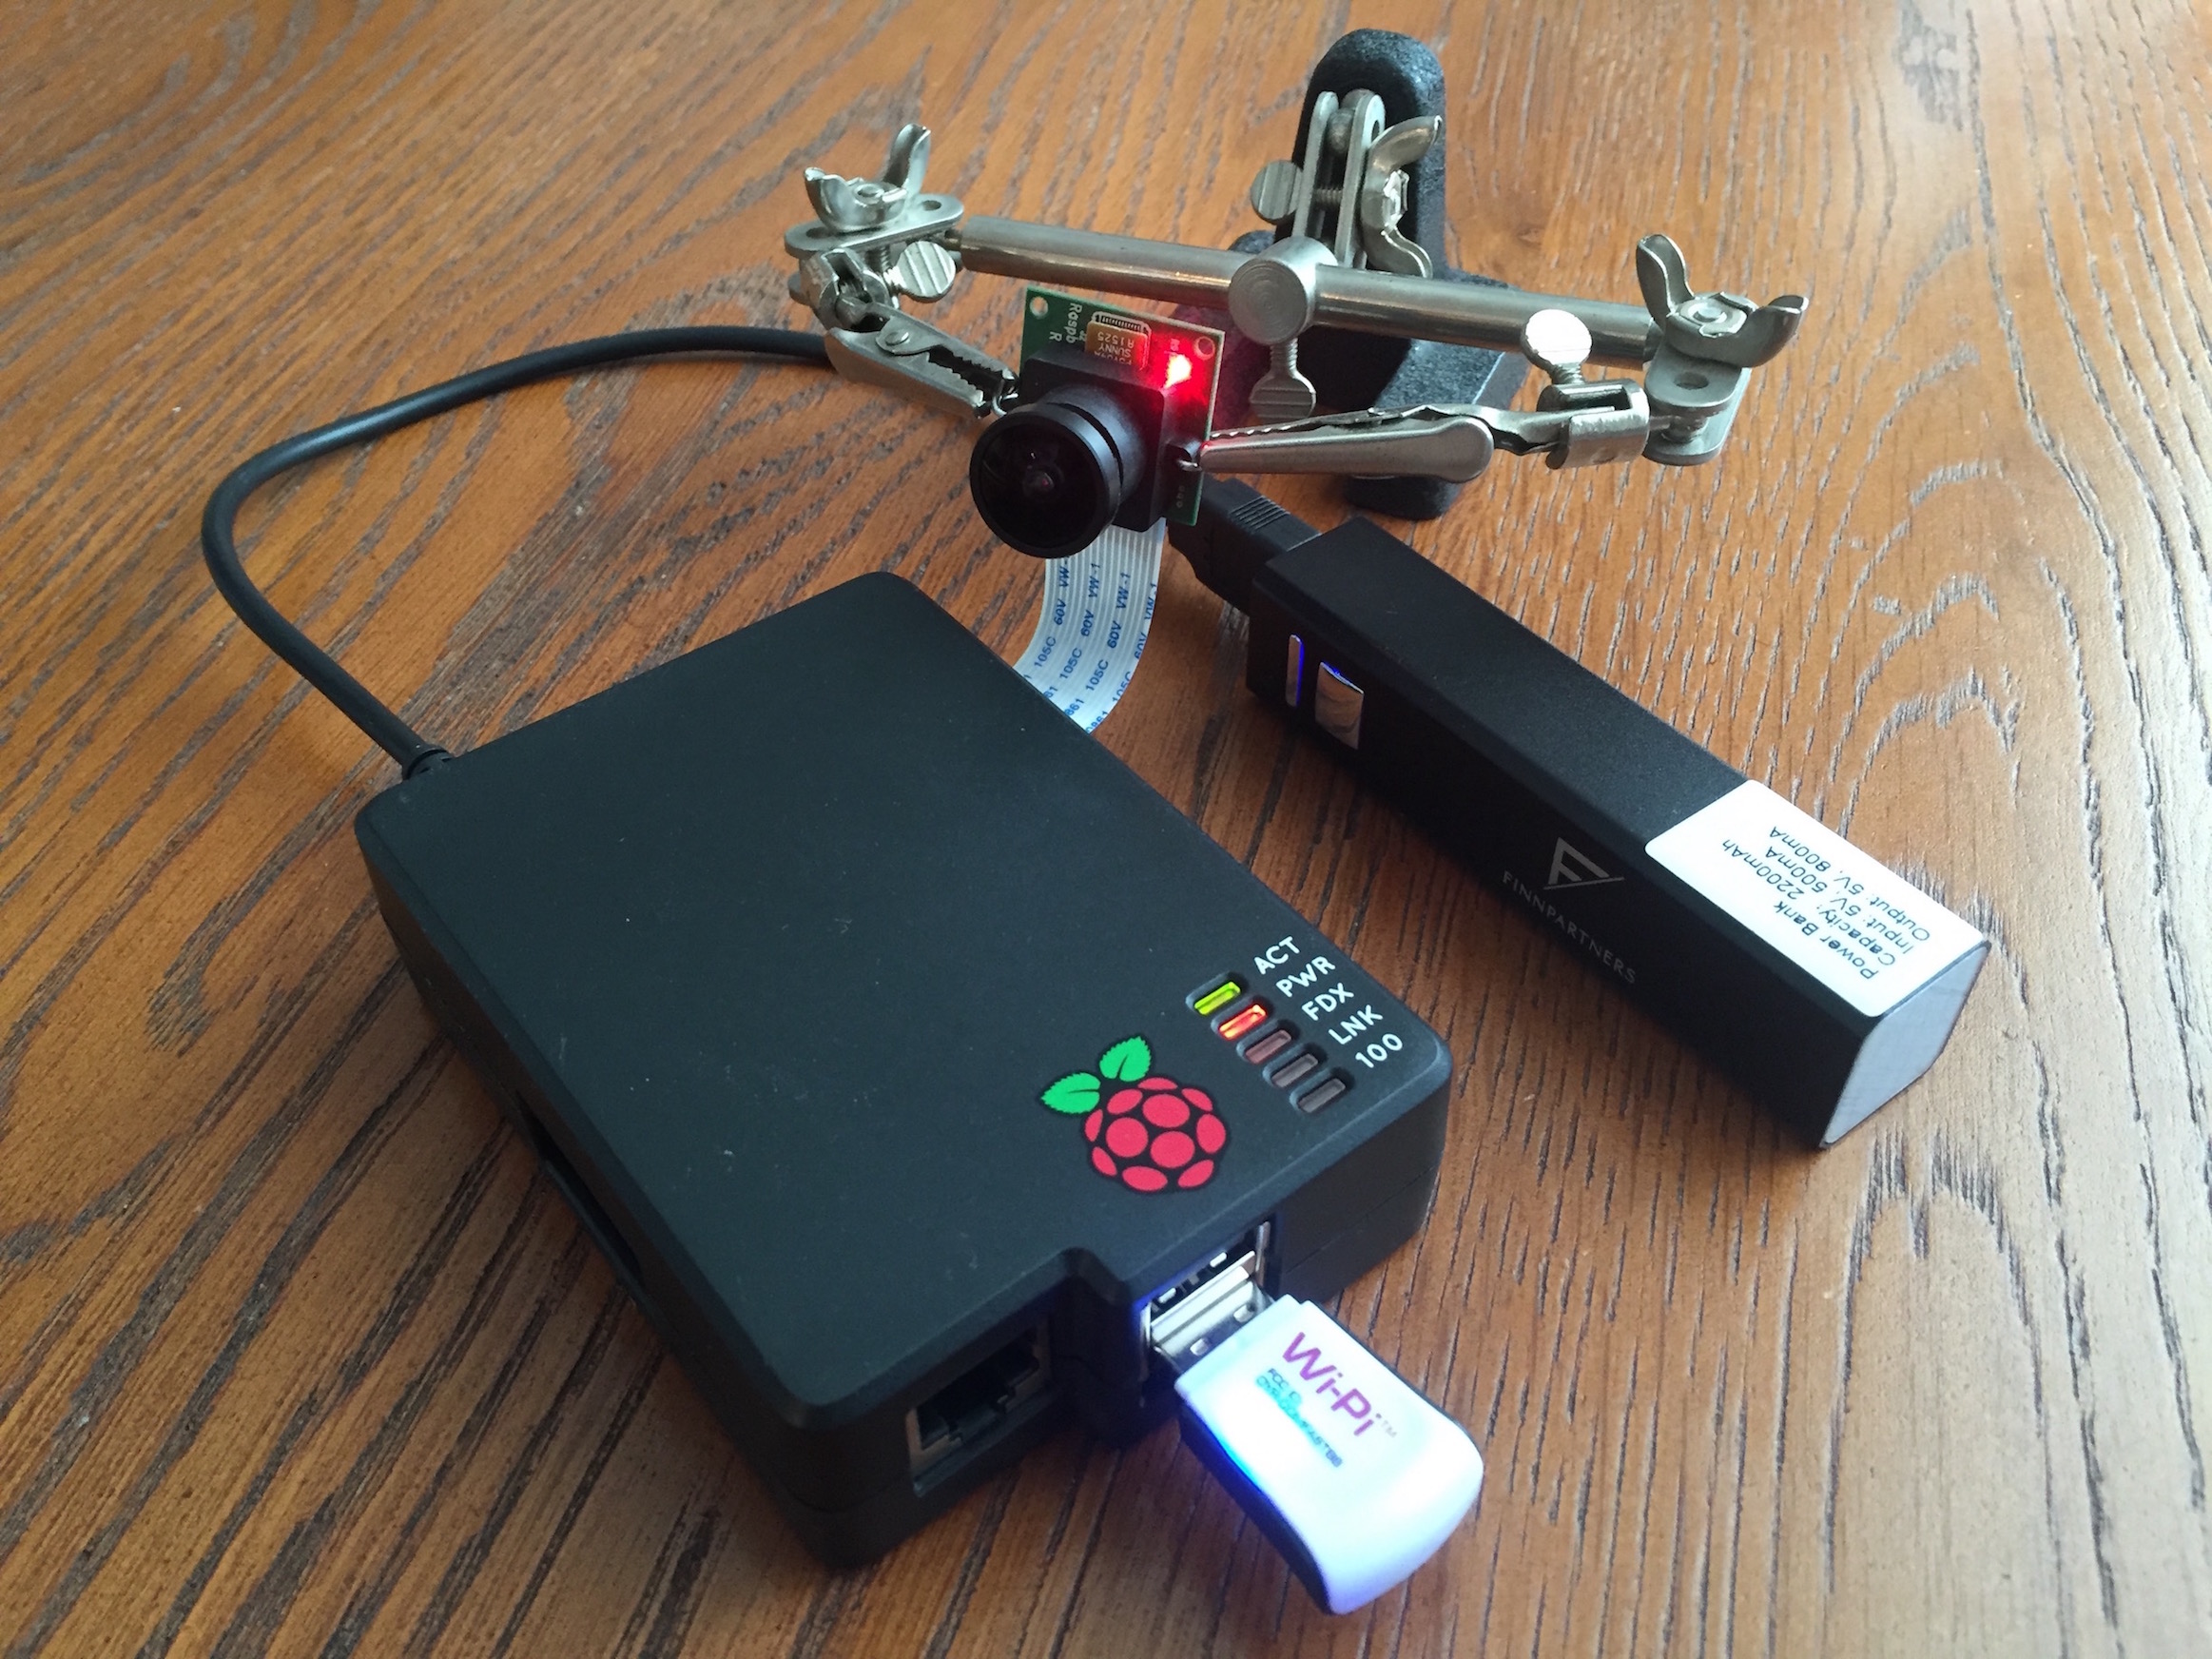
On a related note, as I am working on a cheap time-lapse device using a Raspberry Pi and a Pi Camera with a M12 GoPro HERO fish-eye lens, when I get that going, I'll make a new post.
# published via satellite uplink
